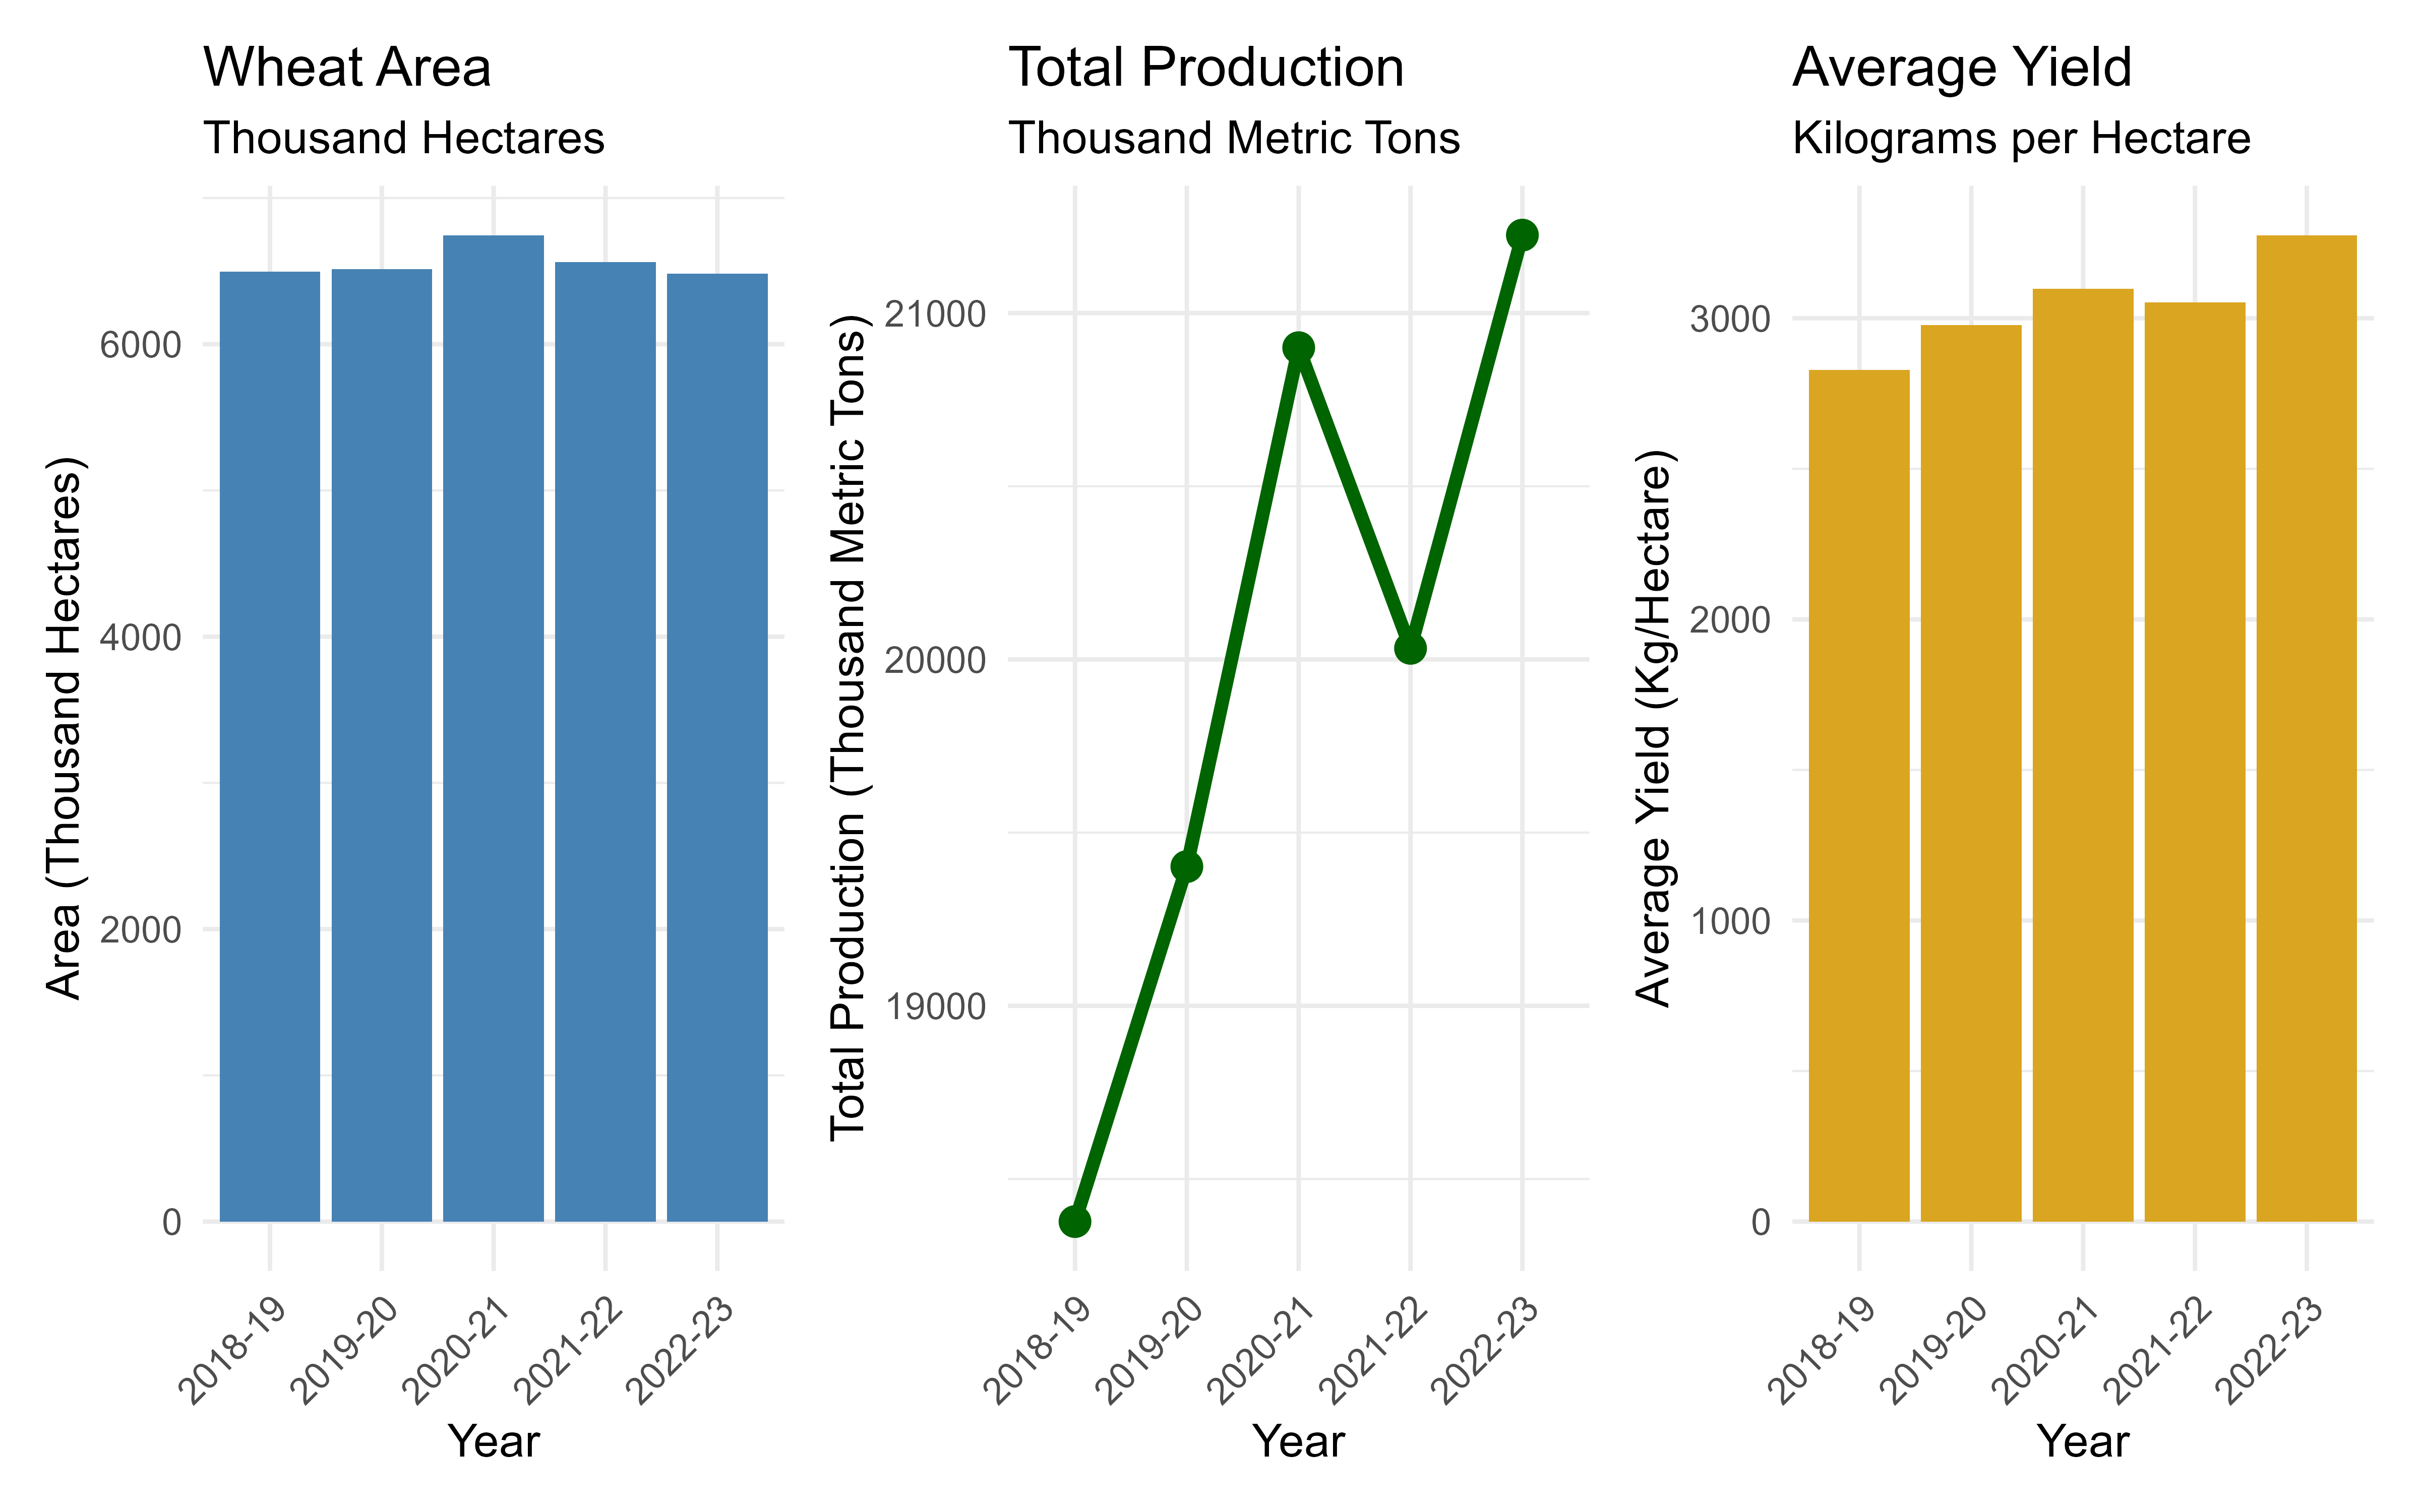
Figure 1: Wheat cultivation area, total production and average yeild in Punjab (2018-2023)
Wheat is one of the most important crops and the staple food of the people. It plays a crucial role in ensuring food security as well as economic stability. Wheat is the most widely cultivated crop in the country, and achieving high production levels requires following the best agricultural practices.
In Punjab last year, wheat was cultivated on approximately 16 million acres, with an estimated production of 26 million tons. The target for the upcoming season is to increase production by 12-15% by adopting advanced agricultural techniques. Given the rising population and climate changes, improving wheat productivity is essential. Farmers must adopt modern agricultural methods, use high-quality seeds, and follow best management practices for soil fertility, irrigation, and pest control to ensure high yields.
The federal and Punjab governments have introduced several initiatives to support wheat farmers. These include subsidies on fertilizers, improved seeds, and agricultural machinery to enhance wheat production. Additionally, research institutions are developing new high-yield and disease-resistant wheat varieties to support farmers.
By adopting modern farming techniques, using high-quality inputs, and following the recommended best practices, farmers can significantly increase wheat production and contribute to national food security.
The analysis of wheat production data in Punjab over the last five years (2018-2023) reveals several key trends. The wheat area, measured in thousand hectares, shows some fluctuation but remains relatively stable. There is a slight peak in 2020-21, followed by a minor decrease in the subsequent years. The total production, measured in thousand metric tons, demonstrates a generally upward trend, indicating increasing wheat output despite variations in the cultivated area. Notably, the highest production is observed in 2022-23. The average yield, represented in kilograms per hectare, also exhibits an overall increase, suggesting improvements in agricultural practices and productivity over time. This upward trend in yield contributes significantly to the growth in total production, even with slight fluctuations in the area under cultivation. Overall, the data indicates a positive trajectory for wheat production in Punjab, with increased yields playing a crucial role in driving overall output growth.
Figure 1: Wheat cultivation area, total production and average yeild in Punjab (2018-2023)
In the year 2022-23, the average wheat yield increased by approximately 7.3% compared to the previous year. The factors contributing to this increase are outlined below:
Timely Sowing: Due to the availability of early-maturing varieties of rice and cotton, wheat was sown on a relatively larger area in a timely manner, specifically in the month of November.
Favorable Rainfall: Frequent and timely rainfall provided better water availability for the crop.
Optimal Temperatures: During the grain formation and filling stages in March and April, temperatures remained favorable for the crop, leading to an increase in the number, size, and weight of grains.
Availability of Improved Varieties: A greater number of improved, high-yielding varieties with adaptability to changing climatic conditions and resistance to rust were available.
Shift to New Varieties: Increased cultivation of new, improved varieties over older, unapproved varieties.
Disease Resistance: Reduced incidence of disease due to the cultivation of rust-resistant varieties.
Certified Seed Supply: Availability and use of certified seed.
Government Initiatives: Initiatives by the Department of Agriculture, Government of Punjab for wheat promotion, and the provision of certified seed, fertilizers, and herbicides at subsidized rates.
| Sr. No. | Variety | Year of Release | Institute | Sr. No. | Variety | Year of Release | Institute |
|---|---|---|---|---|---|---|---|
| 1 | Arooj-22 | 2022 | Wheat Research Institute, Faisalabad | 11 | Akbar-19 | 2019 | Wheat Research Institute, Faisalabad |
| 2 | Nishan-21 | 2021 | Arid Zone Research Institute, Bhakkar | 12 | Bhakkar-19 | 2019 | Arid Zone Research Institute, Bhakkar |
| 3 | Ghazi-20 | 2019 | Regional Agricultural Research Institute, Bahawalpur | 13 | Ghazi-19 | 2019 | Regional Agricultural Research Institute, Bahawalpur |
| 4 | Subhani-21 | 2021 | Wheat Research Institute, Faisalabad | 14 | Fakhr-e-Bhakkar-17 | 2017 | Arid Zone Research Institute, Bhakkar |
| 5 | M.E.-21 | 2021 | Wheat Research Institute, Faisalabad | 15 | Anaj-17 | 2017 | Wheat Research Institute, Faisalabad |
| 6 | Durum | 2021 | Wheat Research Institute, Faisalabad | 16 | Ujala-16 | 2016 | Wheat Research Institute, Faisalabad |
| 7 | Sadiq-21 | 2021 | Regional Agricultural Research Institute, Bahawalpur | 17 | Zangool-16 | 2016 | NARC, Islamabad |
| 8 | Nawab-21 | 2021 | Regional Agricultural Research Institute, Bahawalpur | 18 | Borlaug-16 | 2016 | NARC, Islamabad |
| 9 | N.A.R.C. (Super) | 2021 | NARC, Islamabad | 19 | Johar-16 | 2016 | Regional Agricultural Research Institute, Bahawalpur |
| 10 | Rahbar-21 | 2021 | Film Seed Company, Jahanian | 20 | Faisalabad-2008 | 2008 | Wheat Research Institute, Faisalabad |
| Sr. No. | Variety | Year of Release | Institute | Sr. No. | Variety | Year of Release | Institute |
|---|---|---|---|---|---|---|---|
| 1 | Arooj-22 | 2022 | Wheat Research Institute, Faisalabad | 5 | Barani-17 | 2017 | Barani Agricultural Research Institute, Chakwal |
| 2 | Nishan-21 | 2021 | Arid Zone Research Institute, Bhakkar | 6 | Fateh Jang-16 | 2016 | Barani Agricultural Research Station, Fateh Jang |
| 3 | M.A.-21 | 2021 | Barani Agricultural Research Institute, Chakwal | 7 | Pakistan-13 | 2013 | NARC, Islamabad |
| 4 | Markaz-19 | 2019 | NARC, Islamabad |
Durum-2021: This is a unique type of wheat variety suitable for industrial use, specifically for making pasta products (noodles, etc.).
Arooj-22 and Nishan-21: These varieties are approved for cultivation in both irrigated and rainfed areas.
Sadiq-21 and Nawab-21: These are more suitable for cultivation in Southern Punjab.
Faisalabad-2008 and Pakistan-13: These varieties are susceptible to Karnal bunt disease; therefore, they should be cultivated on a smaller area.
Akbar-19, Nawab-21, and Zangool-16: Nutritionally, these varieties contain a relatively higher amount of zinc.
The optimal sowing time for wheat in irrigated areas is from November 1st to November 20th. However, sowing can be done until November 30th.
For specific varieties:
For other varieties (Arooj-22, Dilkash-20, Akbar-19, Anaj-17, Zangool-16, Johar-16, Borlaug-16, Ujala-16, and Faisalabad-2008), sowing can be done from November 1st to December 10th.
Maintain the following seed rates based on the sowing time. If the germination rate is less than 85%, adjust the seed rate accordingly.
| Sowing Time | Seed Rate |
|---|---|
| November 1st to 20th | 40 to 45 kg per acre |
| November 21st to December 10th | 50 kg per acre |
Increasing the seed rate to a certain extent in late sowing enhances the growth of primary tillers, which positively impacts yield. Furthermore, this increase in seed rate also aids in weed control, as a higher plant population in the crop reduces the opportunity for weeds to flourish.
Seed of improved wheat varieties is available at the depots and dealers of the Punjab Seed Corporation and registered private seed companies. Farmers should take advantage of this facility and use disease-free, certified seed. When purchasing seed, farmers must ensure the authenticity of the certified seed by checking the relevant Federal Seed Certification tag. Registered farmers can obtain seed of selected wheat varieties at subsidized rates under the National Program for Enhancing Per Acre Wheat Yield.
Various diseases such as loose smut, Karnal bunt, wheat blast, and seedling blight commonly attack wheat crops, leading to yield losses. To prevent these, treat the seed before sowing with Thiophenate-methyl at a rate of 2 to 2.5 grams or Imidacloprid + Tebuconazole at a rate of 2 ml per kilogram of seed.
It is preferable to use a rotating drum for seed treatment. However, if a drum is not available, you can use a plastic bag. Add the weighed seed and the recommended fungicide to the bag, tie the mouth of the bag, and shake it thoroughly from both sides to ensure that every seed is coated with the fungicide. Remember to fill the bag only about halfway so that the seed can be shaken properly and the fungicide can adhere well to the seed.
For obtaining a full and robust yield from any crop, it is extremely important for the field to be well-leveled. This ensures that water is applied evenly, and the crop’s germination is uniform and improved. Additionally, agricultural inputs are also distributed uniformly throughout the field. Most importantly, the irrigation given to the wheat crop, especially the first irrigation, can be provided in the required and uniform quantity, and the crop is not adversely affected by water scarcity or excess, leading to better crop growth. Therefore, it is essential to level the field. It is best to use a laser land leveler for this purpose.
Given the rising costs of chemical fertilizers, it is crucial to use them judiciously. The efficiency of fertilizers increases when they are applied through a drill during sowing. Since the fertilizer is placed close to the plant roots, the crop can utilize every granule. Additionally, the crop’s germination becomes more uniform and robust. When sowing with a drill, it is essential to ensure that the tines do not go deeper than 2.5 inches, as this can delay germination and reduce tillering. When applying fertilizer with a drill, do not mix the seed and fertilizer; instead, place them in separate boxes. Avoid applying nitrogenous fertilizers like urea through the drill. While sowing, regularly check the drill. If any pipe dispensing seed or fertilizer gets clogged with soil or if seed/fertilizer is not being dispensed, stop the machine, rectify the issue, and then resume sowing.
Before use, calibrate the drill machine to determine its seed dispensing rate. The procedure is as follows: Fill the seed box with seed. Attach plastic bags to each seed tube. Slightly lift the drill with a tractor and operate it in a way that the wheel driving the drill rotates against the ground, causing the seed to fall and collect in the bags attached to the seed tubes. After a short distance, stop the drill and weigh the seed collected in the bags. Calculate the area covered by multiplying the width of the drill with the distance traveled. Divide the weight of the collected seed by the calculated area to determine the seed rate per unit area and ascertain how much seed the drill will dispense per acre. Adjust the drill’s gauge to increase or decrease the seed rate as per recommendations.
Example
According to the example above, the drill will dispense 90 kilograms of seed per acre, which is about twice the recommended rate. Therefore, adjust the gauge to reduce the rate and repeat the process until the desired rate is achieved. In the case of a combined drill, the fertilizer box adjustment should also be done separately using the same method.
For a good wheat yield, prepare the land thoroughly. Plow the fields two to three times at intervals to kill weeds and convert soil nutrients into an accessible form. Divide the fields into small plots to manage water efficiently. Apply pre-sowing irrigation and plow the field when it reaches the “wattar” (optimal moisture) stage, ensuring the soil is not too sticky. This method is suitable for both irrigated and rainfed areas. In irrigated areas, level the land and plow deeply to ensure proper seed placement. For heavy soils, plow twice, and for lighter soils, plow once before leveling.
In the irrigated areas of Bahawalpur, wheat is primarily sown in cotton and sugarcane fields, and some is sown on fallow land. The following details the sowing methods for different situations:
1. Sowing Wheat After Cotton, Sugarcane, or Other Crops
Wattar Method: Irrigate the field 15-20 days before sowing to allow for proper soil preparation. After the “wattar” stage, plow twice and level the field. Sow the wheat using a drill at a uniform depth for better germination.
Dry Method: After harvesting the previous crop, plow the field once or twice and level it. Sow the wheat using a drill and then irrigate the field. Ensure the seed is sown at a depth of 2 inches. This method saves time and allows for early germination due to ample water availability. It is suitable for most soils, especially heavy soils.
Rouni Method: After harvesting the previous crop, plow the field once and level it. Divide the field into plots and irrigate. After 6-8 hours, when the soil is suitable for working, sow the wheat. This method is suitable for sandy soils as it minimizes the negative effects of waterlogging. For sandy soils with poor drainage, pre-sowing irrigation is not necessary.
2. Sowing Wheat After Rice
Depending on the soil type, plow the field 15-25 days after rice harvest, allowing the soil to reach the “wattar” stage. Use a rotavator or cultivator after rice harvest. Then, level the field and sow the wheat. Avoid burning rice stubble as it contributes to environmental pollution and destroys soil nutrients.
3. Zero Tillage Sowing
If a zero-tillage drill (Pak Seeder) is available, sow wheat directly after rice or any other crop without land preparation. This saves time and reduces costs. After harvesting maize, spread the remaining crop residue and sow wheat using a zero-tillage drill or Pak Seeder. This method reduces environmental pollution. Ensure the soil has adequate moisture for good germination. Research shows that sowing wheat with a Pak Seeder after harvesting rice with a combine harvester yields good results.
4. Bed Planting
Bed planting saves water and improves aeration. It allows for efficient water management and reduces the impact of waterlogging. It is suitable for saline soils and prevents lodging. It also facilitates intercropping of crops like canola and mustard. Bed planting machines are available in the market.
5. Creating Beds After Sowing
Research by the Ayub Agricultural Research Institute and Pakistan Agricultural Research Council shows that creating beds after sowing wheat in areas with poor water absorption can significantly increase yields. This method is beneficial in irrigated areas, especially rice-growing areas and sandy soils. It is not suitable for loamy soils.
6. Sowing Wheat in Standing Cotton
Sometimes, wheat can be sown in standing cotton fields. This method requires careful management. After the final cotton picking, irrigate the field. If there are weeds, remove them. If a drill is available, sow the wheat at a uniform depth. If not, sow the wheat based on the soil moisture. Do not use a rotavator if the soil is too wet. Ensure the field is free of cotton sticks.
The best time to sow wheat in standing cotton is from early to mid-November, but it can be done until November 30th. Use a seed rate of 55-60 kg per acre.
Apply recommended fertilizers with irrigation after cotton picking. Apply the second dose of nitrogen fertilizer with the second irrigation. Ensure that water does not flow over the beds during irrigation to prevent fertilizer loss.
Cut the cotton sticks 30-40 days after sowing (late December or early January) and remove them from the field to prevent hindrance to wheat growth.
In rainfed areas, if crops like Sesbania (Jantar) and Cluster Bean (Guar) are sown in June and then plowed into the soil by August 15-20 (approximately two months later), it enhances soil fertility and leads to better wheat yields. Additionally, cultivating crops during the Kharif season increases the soil’s fertility and water retention capacity and helps control weeds.
After the first monsoon rain, run a moldboard plow (soil turning plow) or chisel plow in the fallow fields so that the soil becomes loose to a significant depth and absorbs maximum water. Before sowing wheat, plow as needed and level the field to destroy weeds and create a layer of loose soil on the surface to absorb and retain more water. Before sowing, plow twice with a regular plow and use a heavy plank to bring moisture to the surface layer of the soil. Sow wheat using a drill. Apply the entire recommended amount of fertilizer before sowing during land preparation.
For obtaining a full wheat yield, determine fertilizer usage based on soil analysis from a laboratory in your district, considering the soil’s basic fertility, texture, type, available canal or tubewell water quantity and condition, cropping intensity, and previous crop.
| Soil Fertility Type | Nutrient Elements (kg/acre) | Fertilizer Quantity (bags/acre) |
|---|---|---|
Poor Soil
|
|
OR
|
Average Fertile Soil
|
|
OR
OR
|
Fertile Soil
|
|
OR
OR
|
| Annual Rainfall | Nutrient Elements (kg/acre) | Fertilizer Quantity (bags/acre) |
|---|---|---|
Low Rainfall Area
|
|
|
Medium Rainfall Area
|
|
|
High Rainfall Area
|
|
|
(These recommendations are based on Soil Fertility Research Institute, Lahore.)
Apply the full amount of phosphorus and potash fertilizers, and the first installment of nitrogen fertilizer at the time of sowing.
It is more effective to apply granular phosphorus and potash fertilizers using a drill at the time of sowing, as this increases their efficiency.
Apply nitrogen fertilizer in 2 or 3 installments, while in sandy areas, apply it in four or more installments, as there is a higher chance of it being lost in such soils.
If phosphorus fertilizer cannot be applied at the time of sowing, apply it with the first irrigation. In the case of late sowing, apply the full amount of fertilizer at the time of sowing.
In rainfed areas, apply the full amount of fertilizer at the time of sowing.
In saline (Kallarathi) soils, use gypsum before the monsoon according to chemical analysis.
Progressive farmers should use 2 bags of DAP per acre.
Alternative fertilizers can also be used to apply the recommended amount of nutrients. The following table can be used as a guide.
| Fertilizer Name | Bag Weight (kg) | Nitrogen (N)(Percentage) | Phosphorus (P₂O₅)(Percentage) | Potash (K₂O)(Percentage) |
|---|---|---|---|---|
| Urea | 50 | 46 | - | - |
| NitroPhos | 50 | 22 | 20 | - |
| Calcium Ammonium Nitrate (CAN) | 50 | 26 | - | - |
| Single Super Phosphate (SSP) 18% | 50 | - | 18 | - |
| Single Super Phosphate (SSP) 14% | 50 | - | 14 | - |
| Triple Super Phosphate (TSP) | 50 | - | 46 | - |
| Diammonium Phosphate (DAP) | 50 | 18 | 46 | - |
| Potassium Sulfate (SOP) | 50 | - | - | 50 |
| Potassium Chloride (MOP) | 50 | - | - | 60 |
Applying Zinc Sulfate (ZnSO4) 33% at a rate of 5 kg per acre and Boric Acid 17% at a rate of 2.5 kg per acre at the time of sowing has a positive impact on wheat yield. If Zinc Sulfate was used in the previous crop, then do not use it in the current wheat crop.
The amount of organic matter in our soils is quite low. Therefore, to maintain the basic fertility and physical condition of the soil, and in view of the rising prices of chemical fertilizers, the use of farmyard manure or green manure is very important. Use well-rotted farmyard manure at a rate of 8 to 10 tons (three to four trolleys) per acre or cultivate guar, jantar, or other leguminous crops before the wheat crop and incorporate them into the soil as green manure when they start flowering. Remember to do this two months before wheat sowing and repeat it every two to three years. In rice areas where Basmati rice varieties are to be cultivated after wheat, jantar or other leguminous crops can be cultivated after wheat harvesting. These crops can be plowed into the soil 15 to 20 days before Basmati rice transplanting, which also helps to restore soil fertility.
When fertilizer is applied to a plant, the roots distribute it to various parts of the plant, including grains, fruits, leaves, and branches. When we harvest the crop, all these parts, including grains, fruits, leaves, and branches, are removed from the field. Consequently, all the nutrients (fertilizer) present in these parts are also taken out of the field.
Therefore, to prevent nutrient loss, after harvesting the crop, besides the fruits, vegetables, or grains, incorporate all the leaves, branches, stubble, etc., back into the soil by using a rotavator or disc harrow, or make compost from them and add it back to the soil. This way, the nutrients (fertilizer) present in them will be returned to the soil, reducing the need for fertilizer in the next crop and minimizing the loss of applied fertilizer.
Irrigate wheat sown after different crops according to the following schedule. However, adjustments can be made to the irrigation schedule based on weather conditions, soil type, and crop needs.
If the weather remains consistently hot and dry, apply an additional irrigation as needed between the first and second, and between the second and third irrigations.
First Irrigation: 35 to 45 days after sowing.
Second Irrigation: 80 to 90 days after sowing (at the booting stage).
Third Irrigation: At the grain filling stage, i.e., 125 to 130 days after sowing (at the milk stage).
First Irrigation: At the tillering stage (25 to 30 days after sowing).
Second Irrigation: At the booting stage (70 to 80 days after sowing).
Third Irrigation: At the grain filling stage (110 to 115 days after sowing) (at the milk stage).
In the Thal region and other hot sandy areas, irrigate wheat according to the following schedule, considering local weather conditions:
First Irrigation: 20 to 25 days after sowing.
Second Irrigation: At the tillering stage (40 to 45 days after sowing).
Third Irrigation: At the booting stage (70 to 75 days after sowing).
Fourth Irrigation: At the flowering stage (90 to 95 days after sowing).
Fifth Irrigation: At the grain filling stage (110 to 115 days after sowing).
Sixth Irrigation: At the grain development stage (130 to 135 days after sowing).
Irrigate the wheat crop with great care and keep the following points in mind to conserve water in case of water scarcity and protect the crop in case of excess water (i.e., rain).
Level the fields so that water is applied in the right quantity and evenly across the field.
After sowing wheat, make small beds in the fields so that water can be applied according to the crop’s needs.
In soils that do not absorb water quickly, sow wheat on ridges to protect the crop from excessive water loss in case of heavy rain.
Stay informed about weather forecasts before irrigating.
Complete the last irrigation by March 25th. However, water can still be applied after this date, considering weather conditions and crop needs.
To achieve high and quality wheat yields, weed control is essential. Adopt the following methods:
Crop Rotation: Rotate crops and cultivate fodder crops like berseem in wheat fields every two to three years.
Harrowing: If possible, harrow twice after the first irrigation when the field reaches the “wattar” stage. This significantly reduces weeds and maintains moisture in the soil for a longer period.
Hand Weeding: If the area is small, hand weed with a hoe or khurpa after crop emergence. This method is quite effective, provided labor is available.
Herbicide Application: Use recommended herbicides in consultation with the Department of Agriculture Extension or Pest Warning staff.
Herbicide Selection: Wheat fields are infested with both broadleaf and grassy weeds. Select the appropriate herbicide accordingly. Spray the recommended herbicide for broadleaf weeds after the first irrigation. Spray for grassy weeds after the second irrigation for effective control. Herbicides that control both types of weeds are also available and can be applied at the 40-45 day crop stage with good results.
Precautions: Use herbicides cautiously in sandy and saline areas. Avoid harrowing or using a bar harrow after spraying, and do not use the weeds as fodder.
Spraying Technique: Always calibrate the sprayer machine. Use 100-120 liters of water per acre. Avoid double spraying in any area or leaving any area unsprayed.
Nozzle and Weather: Use specialized nozzles (Flat Fan or T-Jet) for spraying. Do not spray in strong winds, fog, or rain. Preferably spray in sunlight when dew has evaporated from the leaves.
Fill the spray machine with water up to a set level and spray it on the crop as if you were spraying pesticide. When the water in the machine runs out, measure the area of the sprayed crop. Assume this area is one-eighth of an acre, then eight tanks of water will be required to spray one acre of crop. Divide the recommended per acre quantity of pesticide for the aforementioned one-acre area into eight equal parts and mix one part in each tank of water before spraying.
Due to climate change, untimely and unexpected rains, and abnormal fluctuations in temperature, harmful and unexpected effects occur on crops. Additionally, the intensity of attacks by harmful insects and diseases also varies. These effects also impact the sowing time. To minimize these effects, stay informed about weather forecasts, take special care of crop maintenance and plant protection. In case of excessive rain, arrange for drainage of water from wheat fields. In case of drought and high temperatures, irrigate the crop according to its water needs. Sow wheat on ridges in clayey and low-lying soils. Sow varieties that are resistant to smut. Sow varieties that have relatively better resistance to lodging (falling over). Sow varieties that are adaptable to climate change.
Various insects, birds, and rodents attack the wheat crop, causing damage. Among these, the wheat aphid is the most significant.
| Pest Name | Identification | Method of Damage and Harm | Control |
|---|---|---|---|
| Wheat Aphid (Aphid) | This is a small, greenish insect with a pear-shaped body. Two tubes are visible at the rear of its body, from which a sweet substance called “honey dew” is secreted. This honey dew causes a black sooty mold to grow on the leaves. | This insect sucks sap from the leaves, shoots, and ears of the plant, weakening and stunting growth. In severe infestations, grains shrink, negatively impacting yield. The attack is more prevalent from mid-February to March. In severe infestations, a black sooty mold develops on the leaves, hindering the plant’s ability to photosynthesize. |
|
| Black Ant | This insect makes underground nests. | They damage seeds and seedlings. |
|
| Termites (Termites) | This is a small, pale-colored insect that lives in colonies underground. | They attack the roots of the crop, causing the plants to wilt and die. The attack is more common in dry areas. |
|
| Cutworm (Cutworm) | This insect is active at night and hides in the soil during the day. | It cuts the seedlings at the base, damaging the crop. |
|
| Armyworm (Armyworm) | This insect is greenish-brown and has stripes on its body. | It feeds on leaves and ears of the crop, causing significant damage. |
|
| Pink Borer (Pink Borer) | This insect damages the stems and ears of the crop. | The larvae bore into the stems and ears, feeding on the developing grains and weakening the plants. |
|
| American Bollworm (Helicoverpa armigera) | This insect has a variable color and feeds on various crops. | It feeds on the leaves and ears of the crop, causing significant damage. |
|
| Rodents (Rats) | These are commonly found in fields and cause damage to various crops besides wheat. | They eat and damage the crop. They also damage irrigation channels and bunds. |
|
| Birds (Sparrows, Starlings, Crows, etc.) |
|
|
The aphid attack occurs first on the mustard crop, and beneficial insects also appear first on it. When the aphid attack starts on wheat, these beneficial insects move onto the wheat and control the aphids by eating them within a few days. The aphids that attack mustard do not attack wheat, and the aphids that attack wheat do not attack mustard. However, the beneficial insects found on both crops eat and successfully control all types of aphids. Additionally, extra income can be earned from the mustard yield. Therefore, intercrop two lines of mustard or canola in the wheat field at a distance of 100 feet.
| Disease Name | Cause of Disease | Symptoms | Prevention |
|---|---|---|---|
| Rust (Kungi) | This disease is caused by fungi. It spreads due to air and moisture. The attack of this fungus occurs in cold and humid weather. Two types of rust attack wheat in Punjab:
|
Winter rains help in the spread of this disease. In yellow rust, small yellow spots appear in parallel rows or lines. In brown rust, brown spots are irregular and scattered, due to which a brown rust-like powder appears on the leaves. Remember, yellowing of leaves alone is not a symptom of rust. |
Use potash fertilizers to enhance plant resistance. |
| Karnal Bunt (Juzvi Kangyari) | The cause of this disease is a fungus (Tilletia indica). Its spores are present in infected seeds and infected fields. | In this, a few tillers of the plant become diseased. A few grains from the remaining tillers and green ears are affected by the disease. The disease attack occurs when the ear emerges. Some part of the grain is affected by the fungus and turns into black powder, while starch remains preserved in the rest. |
|
| Loose Smut (Khuli Kangyari) | This disease is caused by a type of fungus called (Ustilago tritici). This disease originates from infected seeds and appears during ear emergence. | This disease appears in the form of black powdery ears. This black powder, which is seen in diseased ears instead of grains, is actually the spores of the disease-causing fungus. These spores fly from the ears through the air and fall on the newly formed ears of healthy plants. The disease remains inside the grain. Using these grains as seeds in the following year causes the disease. This disease has attacked all of Punjab, although its attack is more severe in rain-fed areas. |
|
| Foot Rot (Gundum ka Akheira) | This disease is also caused by Fusarium fungus (species) | It spreads by sowing diseased seeds or due to the presence of the disease-causing fungus in the soil. This disease attacks plants twice: the first attack is on seedlings, and the second is on young plants. In the first case, germination is very low. The second attack occurs in February-March. At this time, the affected plants die. However, the ears either become completely devoid of grains, or the grains remain small. |
|
| Powdery Mildew (Gundum ki Safoofi Phaphundi) | This disease is caused by a type of fungus called (Erysiphe graminis). This disease spreads through the air. | This disease can attack all above-ground parts of the wheat plant, but it usually appears as white powdery patches on the upper surface of the leaves. The affected part of the leaf turns brown or dark brown on the underside. The grains become shriveled and thin, and the yield decreases. Cool, cloudy, and high humidity conditions are favorable for it. |
|
Other diseases like blight of gram, leaf spot, and bunt of wheat can also attack the crop. Prevent these diseases by treating seeds with recommended fungicides and following other recommended practices.
If the crop has been harvested with a combine harvester, use a wheat straw chopper to make straw. This provides additional income and allows for proper utilization of crop residues instead of burning them.
Burning crop residues is strictly prohibited. Therefore, do not burn stubble or other residues after harvesting the crop, as it causes environmental pollution. Additionally, fires near highways can lead to fatal accidents. It is also dangerous to burn residues at this time of year because there is a risk of nearby standing wheat crops catching fire. Controlling fires in hot weather is very difficult. Therefore, do not burn crop residues at all. Instead, make straw using a straw-making machine and increase the profitability of the crop. Alternatively, incorporate these residues into the soil using a rotavator to improve its fertility and reduce the use of expensive fertilizers.
In fields where there is a gap of about one and a half to two months before the next crop is sown after wheat harvesting, such as in rice areas where Basmati varieties are to be sown, cultivate green manure crops after wheat harvesting. Notable examples include Sesbania (Jantar), Mung bean (Moong), Cluster bean (Guar), and Cowpea (Rowan). Incorporate these crops into the soil using a rotavator when they start flowering and then sow the next crop. This helps to improve soil fertility and significantly reduces the fertilizer requirement of the subsequent crop.
Farmers should adopt the following precautionary measures to protect wheat from harmful insect infestations during storage.
While threshing wheat, ensure that the grains are not broken, as broken grains are more susceptible to insect attacks.
When storing grain in warehouses, the moisture content should not exceed approximately 10%. If the grains break with a cracking sound when pressed between the teeth, the moisture content is appropriate. If the moisture content is high, dry the grain in the sun.
Use new bags for storing grain. If using old bags, spray them thoroughly with a recommended pesticide solution and dry them before use. If possible, use hermetic bags or hermetic cocoons for storing wheat, which do not require fumigation and can keep the grain safe for a long time.
Clean the warehouses thoroughly. If there are any cracks, seal them with mud or cement. Spray a suitable pesticide as advised by the Department of Agriculture staff and close the doors for at least 48 hours. Open the doors after this period. Do not enter the warehouses for 4 to 6 hours.
Use 30 to 35 tablets of aluminum phosphide per thousand cubic feet to control rodents and insects in warehouses. Fumigate the warehouses twice a year: once when storing the grain and again during the rainy season when humidity increases. During fumigation, the warehouses should be completely airtight and remain closed for at least seven days. Enter the warehouses 4 to 6 hours after opening them. Tie the pesticide tablets in a cloth and dispose of the ash afterwards; do not let it mix with the grain.
To protect grain from rodents, make recommended poison pellets and place them on rodent pathways at night. The rodents will eat them and die.