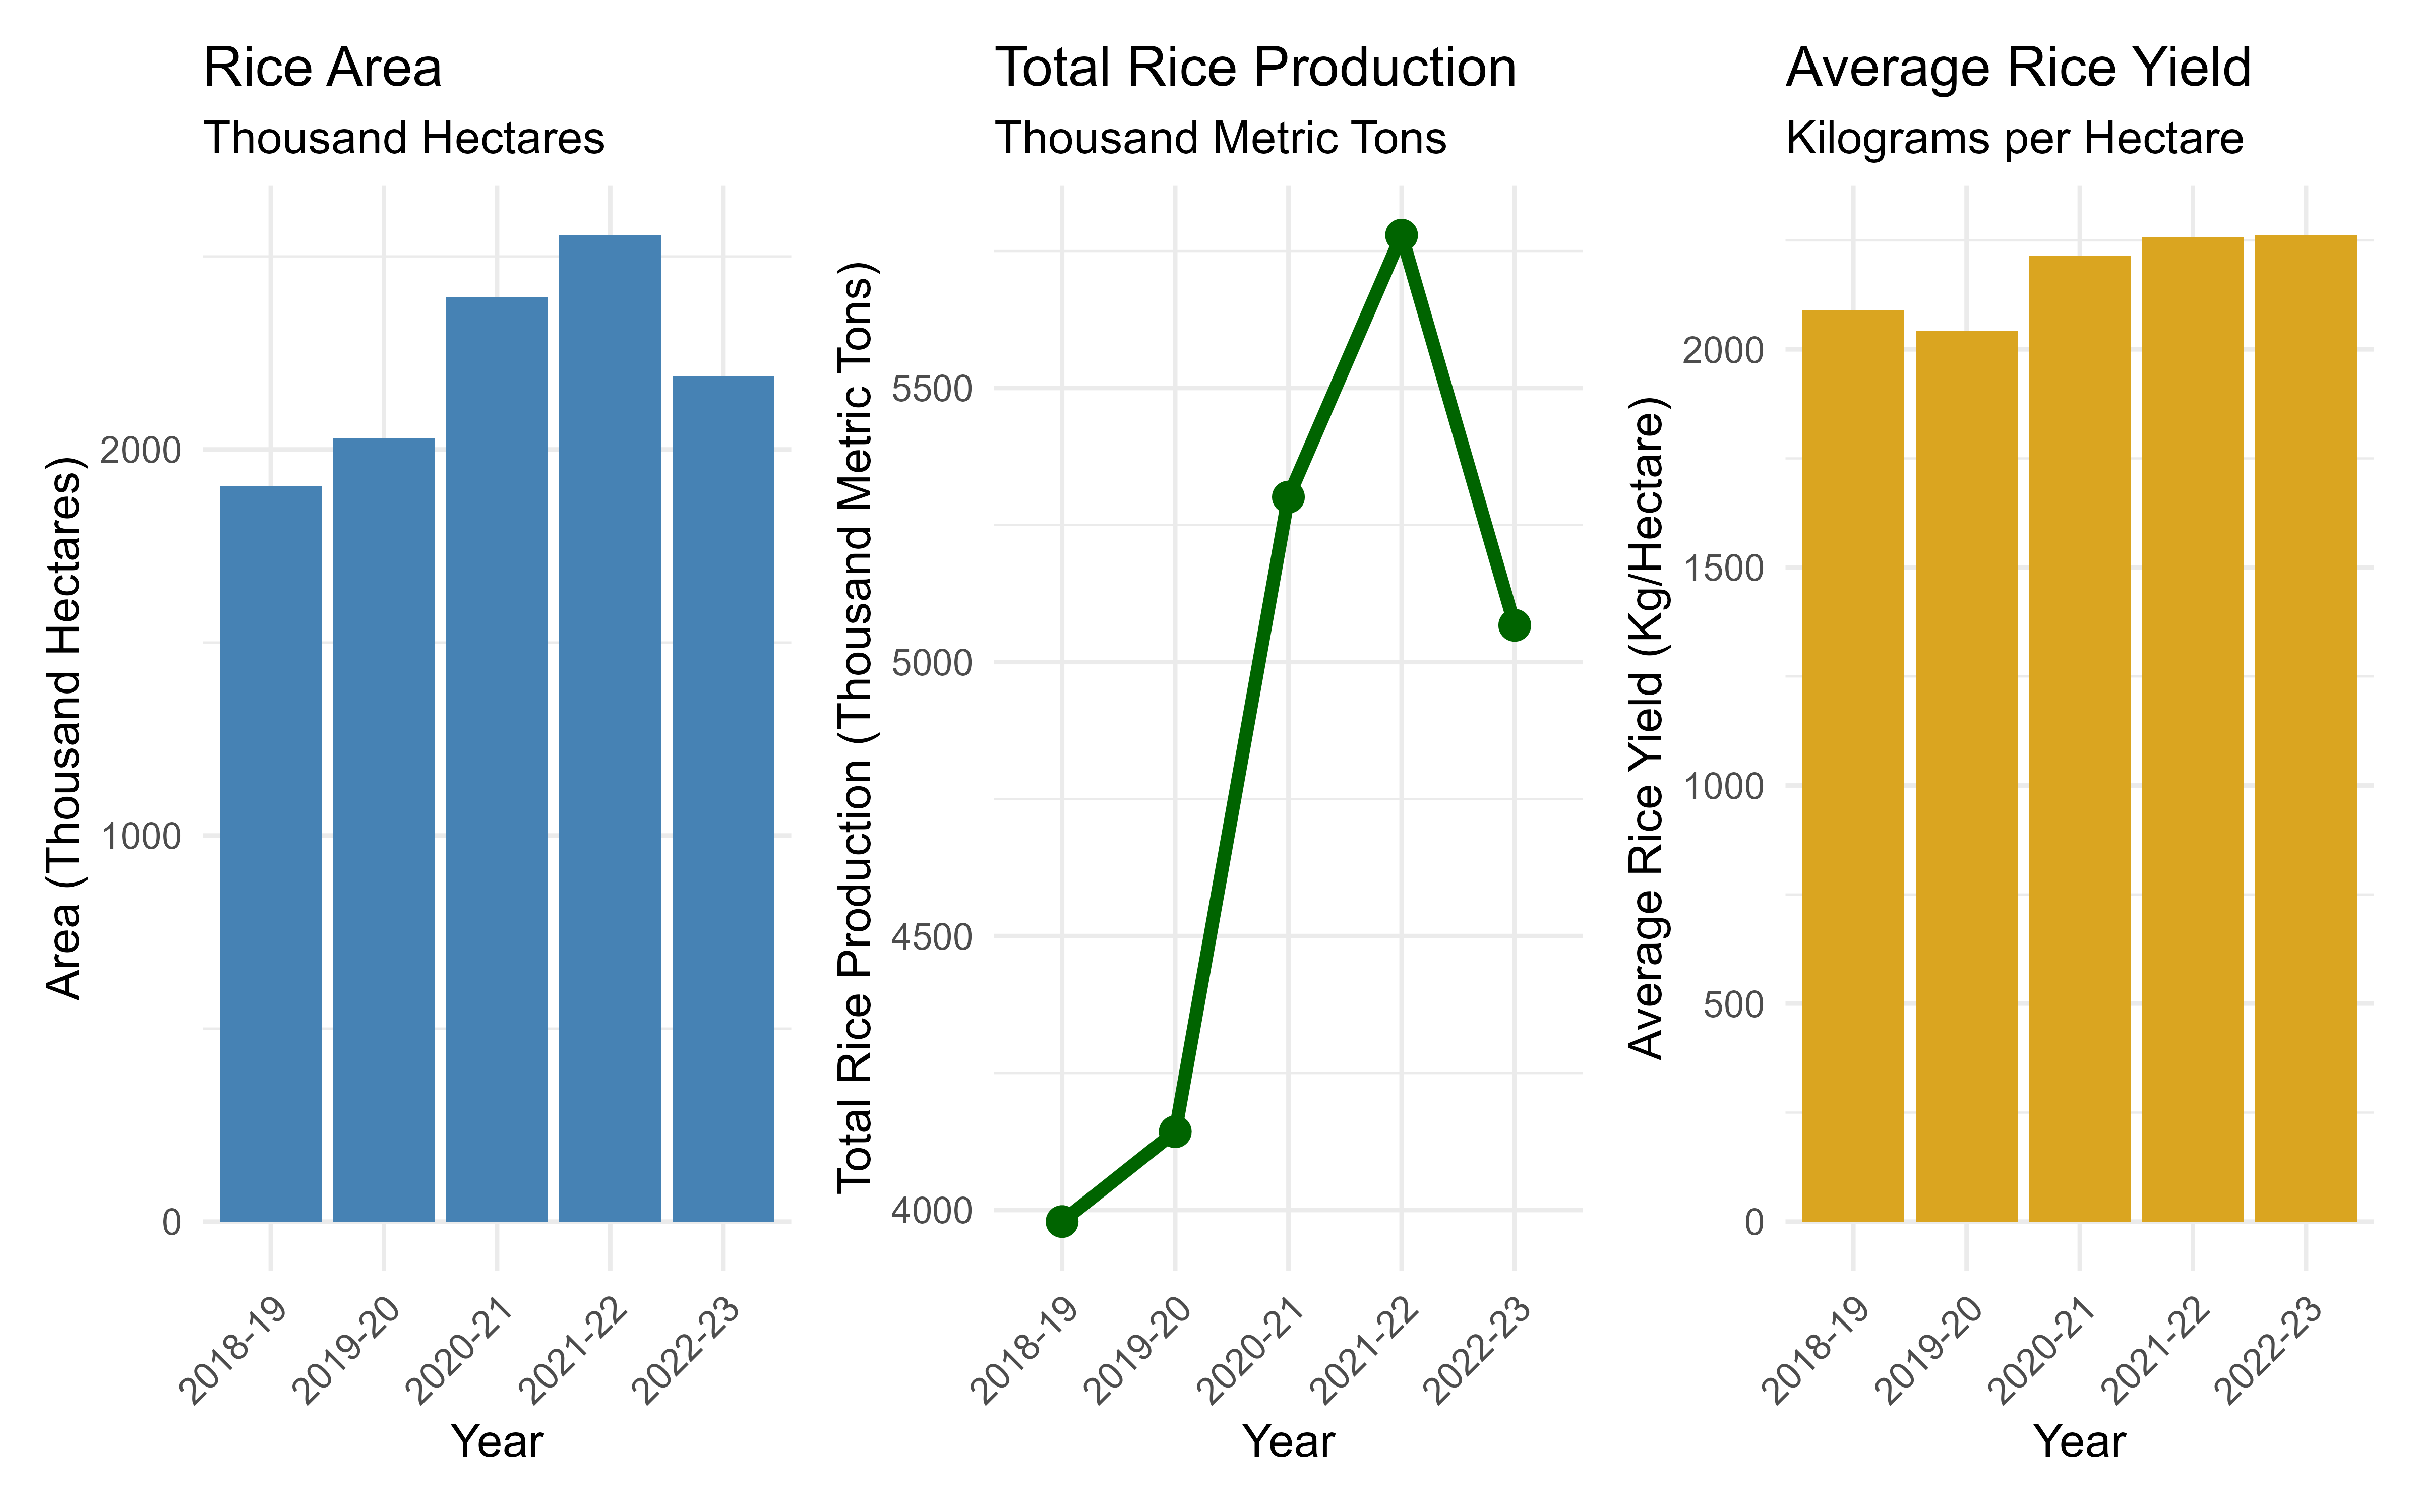
Figure 1: Wheat cultivation area, total production and average yeild in Punjab (2018-2023)
The rice crop plays a crucial role in meeting the domestic rice needs and earning foreign exchange. Rice flour is used in baking and confectionery, and in some regions, bread is also made from it. Rice bran powder is used to extract high-quality edible oil with unique properties. The rice grown in the traditional rice-growing areas of Punjab is renowned worldwide. Rice straw is used as fodder for livestock, and its husk is used as feed for donkeys and horses. Its residues provide raw materials for several industries.
Under the Agricultural Emergency Program, the national program to increase rice yield per acre, in collaboration with the Government of Punjab, is underway in selected districts of Punjab since 2019-20 for the agricultural development of the country and the prosperity of farmers. Under this program, registered farmers are being provided with certified seed, weedicides, and zinc sulfate at subsidized rates. Additionally, demonstration plots, seminars, and farmer days are being organized to introduce modern agricultural technology for rice to farmers, and an awareness campaign regarding increasing rice production is being conducted.
The details of the total area under rice cultivation, total production, and average yield per acre in Punjab are given below. These statistics are issued by the Crop Reporting Service Punjab.
The total area under rice cultivation has fluctuated significantly over the years. In 2018-19, the total area was 1.90 million hectares, which increased to 2.56 million hectares in 2021-22, marking a peak in cultivation. However, in 2022-23, the estimated cultivated area declined to 2.19 million hectares, indicating a contraction. Basmati rice, known for its premium quality, dominated the cultivated area, but its share varied over time. While Basmati cultivation expanded from 1.47 million hectares in 2018-19 to 1.87 million hectares in 2020-21, it later declined to 1.67 million hectares in 2022-23. On the other hand, non-Basmati rice, which had a smaller share in the initial years, saw a considerable rise from 0.43 million hectares in 2018-19 to 0.78 million hectares in 2021-22, before falling slightly to 0.51 million hectares in 2022-23. This shift suggests possible changes in market demand, policy influences, or climatic factors affecting cultivation decisions.
Rice production followed a similar pattern, showing growth until 2021-22 before experiencing a decline in the most recent estimates. The total rice output increased from 3.98 million metric tons in 2018-19 to a peak of 5.78 million metric tons in 2021-22. However, in 2022-23, production declined to 5.07 million metric tons, which may reflect the decrease in the cultivated area. Basmati rice production reached its highest at 4.01 million metric tons in 2020-21, but then dropped slightly to 3.65 million metric tons in 2021-22, recovering to 3.73 million metric tons in 2022-23. In contrast, non-Basmati rice production showed a strong upward trend, increasing from 1.03 million metric tons in 2018-19 to 2.13 million metric tons in 2021-22, before falling to 1.33 million metric tons in 2022-23. The rise in non-Basmati production before 2022-23 suggests its growing importance in the market, possibly due to shifts in export demand or local consumption preferences.
Rice yield per hectare has generally shown an improving trend, reflecting better farming practices, improved seed varieties, or favorable weather conditions. The overall rice yield increased from 2,090 kg per hectare in 2018-19 to 2,262 kg per hectare in 2022-23. Basmati rice yields remained lower than non-Basmati throughout the period, likely due to differences in genetics and agronomic requirements. The yield of Basmati rice fluctuated between 2,002 kg per hectare in 2018-19 and 2,060 kg per hectare in 2022-23, showing a gradual increase. Non-Basmati rice consistently had a higher yield, improving from 2,229 kg per hectare in 2018-19 to 2,717 kg per hectare in 2022-23, with a peak at 2,704 kg per hectare in 2021-22. This trend suggests that advancements in non-Basmati rice production technology and agronomic practices have contributed to higher productivity levels.
| Year | Total (Basmati + Non-Basmati) | Basmati | Non-Basmati |
|---|---|---|---|
| 2018-19 | 1904.00 | 1473.03 | 430.97 |
| 2019-20 | 2029.05 | 1662.01 | 367.04 |
| 2020-21 | 2394.48 | 1871.64 | 522.84 |
| 2021-22 | 2555.14 | 1771.68 | 783.46 |
| 2022-23 (Second Estimate) | 2189.31 | 1678.61 | 510.70 |
| Year | Total (Basmati + Non-Basmati) | Basmati | Non-Basmati |
|---|---|---|---|
| 2018-19 | 3979.00 | 2949.17 | 1029.83 |
| 2019-20 | 4143.72 | 3243.99 | 899.73 |
| 2020-21 | 5301.40 | 4014.18 | 1287.20 |
| 2021-22 | 5779.00 | 3650.00 | 2129.00 |
| 2022-23 (Second Estimate) | 5067.00 | 3733.00 | 1334.00 |
| Year | Total (Basmati + Non-Basmati) | Basmati | Non-Basmati |
|---|---|---|---|
| 2018-19 | 2090 | 2002 | 2229 |
| 2019-20 | 2042 | 1952 | 2287 |
| 2020-21 | 2214 | 2145 | 2462 |
| 2021-22 | 2257 | 2059 | 2704 |
| 2022-23 (Second Estimate) | 2262 | 2060 | 2717 |
The production and average yield are given in terms of rice. To convert rice figures to paddy, divide by 0.6. For example, if the average rice yield given above is 22.88 maunds per acre, then in terms of paddy, it is 22.88 / 0.6 = 38.13 maunds per acre.
Figure 1: Wheat cultivation area, total production and average yeild in Punjab (2018-2023)
Due to water shortage in canals and load shedding, there was a water shortage at the time of transplanting, and the rice area shifted towards cotton, sugarcane, and sesame.
The decrease in production was due to the decrease in area, however, the average yield improved due to better weather conditions at the time of crop ripening.
Experiments have shown that using the following seed rates results in a healthy and vigorous nursery, leading to increased yields.
| Sowing Method | Basmati/Fine Varieties (kg/Marla) | Coarse Varieties (kg/Marla) |
|---|---|---|
| Puddling Method | 0.5 to 0.75 kg | 1 kg |
| Dry Method | 0.75 to 1 kg | 1.5 kg / Marla |
| Raab Method | 1 kg | 2 kg |
Do not cultivate unapproved and prohibited varieties such as Super Fine, Supra, Supri, 1692, 1847, PB7, 1718 and 1885, as their rice quality is poor. Mixing them with other varieties affects the overall rice quality and negatively impacts the reputation of Pakistani rice in the international market due to low prices.
According to the Punjab Agricultural Pests Ordinance 1959, sowing rice nurseries or crops before May 20th is prohibited. This is because stem borer larvae overwinter in rice stubble. Data from light traps indicate that stem borer moths emerge mostly in late March and early April. If rice nurseries or crops are sown during this period, the moths lay eggs on them, starting their next generation.
To determine the germination rate, take four hundred seeds from each seed lot and soak them in water. After 24 hours, wrap them in a damp cloth and keep them in a shaded place for 36-48 hours, keeping the cloth moist. During this time, the seeds will sprout. Count the sprouted seeds to determine the germination percentage. Remember, the seed germination rate should be above 80%. If not, increase the seed rate per acre accordingly.
Treat seeds with recommended fungicides before sowing, following the instructions on the label. If nurseries are being raised using the puddling method, use one and a quarter times the recommended amount of fungicide in water and soak the seeds in this solution. After 24 hours, place the seeds in a shaded area for sprouting.
Clay loam soil is suitable for rice cultivation, but it can be grown in all types of soil except sandy soil. Rice can also be grown in saline and alkaline soils with proper care.
Nursery sowing can be done using the following methods, depending on the area and soil type:
In traditional rice-growing areas, nurseries are commonly raised using the puddling method.
Take one and a quarter times more water than the seed quantity and dissolve the recommended fungicide in it. Soak the seed in this solution for 24 hours. After that, spread the seed on a floor in a shaded place, make piles of 15 to 20 kilograms, and cover them with damp sacks or similar materials (i.e., give them “Dabo”). Turn the seed piles two to three times a day and sprinkle water on the sacks to keep the seed moist. The seed will sprout in 36 to 48 hours.
If you have to use home-saved seed due to the unavailability of certified seed, before the above step, dissolve 500 grams of edible salt in 20 liters of water and soak the seed in it. Inferior and light seed will float to the top. Skim this off and discard it. Then wash the seed thoroughly with water and prepare it using the method described above.
Along with seed preparation, continue preparing the field. For this, plow the field with a dry plow once or twice and then irrigate it. After irrigating, plow twice with a wet plow and level the field (i.e., puddle it). Divide the prepared field into ten marla plots. Use a pre-emergence herbicide for weed control as per the instructions provided in this document.
Broadcast the sprouted seeds and ensure there is one to one and a half inches of standing water in the field while broadcasting. Broadcast the seeds in the evening and drain the water from the field the same evening. Re-irrigate the field the next morning because there is a risk of the seeds rotting due to the water heating up in the sun. Stop this practice after one week. Increase the water depth as the seedlings grow, but do not exceed three inches. Seedlings are ready in 25 to 30 days using this method. If the seedlings are weak, broadcast one-quarter pound (250 grams) of urea or 400 to 500 grams of calcium ammonium nitrate per marla ten days before transplanting.
If rice is to be planted on a large area, sow the seedlings in batches with a gap of one to ten days so that the seedlings prepared by puddling are not older than 25 to 35 days at the time of transplanting. Remember that the seedling age of Kissan Basmati should not exceed 25 days at the time of transplanting.
This method is for loamy soils where water cannot stand. Prepare the field by harrowing and planking when it reaches “wattar” (optimal moisture), and broadcast dry seeds. Spread a one-inch layer of stubble, straw, or parali over it. Then irrigate the field with light water. Place dry grass etc. in front of the water outlet to prevent the seeds from being washed away by the force of the water. Remove the stubble or parali after a few days so that sunlight can reach the seedlings. Seedlings are ready in 35 to 40 days using this method. Spray the recommended herbicide 15 days after germination for weed control.
This method is prevalent in the districts of Dera Ghazi Khan and Muzaffargarh, where the soil is generally hard. After initial preparation, spread a two-inch layer of cow dung, stubble, or parali on the prepared field and set it on fire in the morning or afternoon. After the ash cools, mix it into the soil by harrowing. Then broadcast dry seeds and irrigate lightly. Seedlings are ready in 35 to 40 days using this method.
After puddling, apply the recommended pre-emergence herbicide at the prescribed rate by scattering it in the field using a shaker bottle. Keep the field flooded for 36 hours after application and then drain the water and irrigate with fresh water. Repeat the process of draining and irrigating two to three times and then broadcast the sprouted seeds in standing water.
If pre-emergence herbicides could not be used for any reason or weeds have emerged, spray the recommended post-emergence herbicide. Do not flood the field at the time of spraying. Do not guess the amount of herbicide to be used, as a slight mistake or carelessness at this stage can hinder the growth of the nursery or even destroy it completely. Therefore, use the recommended amount of herbicide and application method according to the instructions on the label and the recommendations of the Department of Agriculture.
Sometimes, the “Toka” (likely referring to a specific pest, possibly a type of grasshopper) severely attacks the nursery, necessitating re-planting. To prevent this, it is essential to clean the field bunds and water channels. In February-March, dust or spray the recommended pesticide on the field bunds to kill the pests as soon as they hatch from eggs and prevent them from reaching the nursery. If the “Toka” attack on the nursery reaches the economic threshold (2 “Toka” per net), dust or spray the recommended pesticide on the nursery and surrounding field bunds. When the stem borer attack reaches the economic threshold (0.5% dead hearts), apply the recommended granular pesticide. Remember not to apply pesticides to the rice nursery without proper inspection.
Plow the field once with a dry plow so that the soil is quickly and well prepared during puddling. Ten to fifteen days before transplanting the nursery, flood the field and then puddle it. If there is a shortage of water, keep the field flooded for 5 days, and if there is an excess, keep it flooded for 3 days and then puddle. At the time of puddling, add the recommended amount of fertilizer under the last planking. Transplant the nursery the next day after puddling. In areas free from salinity where heavy clay soil and ample water are available, plow with a soil-turning plow (Raja Plow) once before puddling. This significantly increases rice yield and also has a positive impact on subsequent Rabi crops. Do not use a Raja Plow during the reclamation of saline-sodic soils. Do not puddle in saline soils, as it will prevent salts from leaching down. In fields or areas where water does not stand, prepare the land using the dry method.
Traditionally, puddling is done using plows and planks, but the use of rotavators is also becoming quite popular. If possible, use a water-tight rotavator for this purpose. This rotavator is specifically designed for puddling. It has additional seals etc. to protect the bearings and other parts from water. This method results in better puddling and also prevents damage to the rotavator.
In non-traditional rice-growing areas where the soils are loamy and absorb water quickly, the land is prepared in a dry state. Until the seedlings are transplanted to the field, the land is repeatedly plowed and planked three to four times at intervals to make the soil fine and friable. The field is flooded with water before transplanting the seedlings. This method results in a significant growth of weeds in the field. To control them, the field is irrigated at intervals during land preparation to allow weeds to germinate, which are then killed by plowing. Post-emergence herbicides can be used for chemical control.
Irrigate the nursery one or two days before transplanting so that the soil becomes soft and the seedlings do not break while uprooting. Discard scorched, diseased, or insect-affected seedlings while uprooting. Maintain a plant-to-plant spacing of 9 inches and plant 2 seedlings per hill. This will result in approximately 80,000 hills and 160,000 plants per acre. Transplant the seedlings in about one and a half inches of standing water. Maintain a water depth of one and a half inches in the first week and then gradually increase it to three inches, but do not exceed this limit, otherwise, the plants will develop fewer tillers and the yield will be reduced. If some gaps remain, fill them within 10 days of transplanting.
Prepare the nursery on non-saline land. Cultivate salt-tolerant varieties such as Niab Ari-9, KS-282, KS-133, PK-386, Niab-2013, Shaheen Basmati, Al-Khalid Rice, and sometimes GSR-6. The seedling age should be 35 to 40 days at the time of transplanting. Start land preparation by deep plowing the field, but avoid thorough puddling to allow salts to leach down with irrigation water. Keep the field flooded with water 7 to 10 days before transplanting. Rice growth is affected by excess white salts within ten days of transplanting. The solution is to change the water in the field. Growth is affected by excess black salts within a few days of transplanting. The growth of the crop can be restored by using sulfuric acid and gypsum in such soils based on soil analysis.
Weeds that grow in the rice crop are divided into three different groups.
The leaves of weeds in this family are thin and pointed. The stem is usually round and jointed. The plants lie flat on the ground surface, but some also grow upright. Important weeds include: Bansi grass, Swanki ghas (Echinochloa colona), Ghora ghas (Leptochloa chinensis), Dhidhan ghas (Echinochloa crus galli) or Barnyard grass, Naroo ghas (Paspalum paspaloides), and Kalar grass (Diplachne fusca), Lamb ghas (Leptochloa panicea), etc.
The leaves of weeds in this family are pointed, channel-like, long, and shiny. Their stem has three corners. There is a long and clear vein in the middle of the leaf. In the province of Punjab, the weeds belonging to this group in the rice crop are: Ghoeen (Cyperus difformis), Bhoeen (Cyperus iria), and Deela or Mork (Cyperus rotundus), etc.
The leaves of weeds in this family are broad and of different shapes. The stem is somewhat hard, and the plant grows upright from the ground. Important weeds include: Dog Mustard or Hulhul (Cleome viscosa), Mirch Booti (Sphenoclea zeylanica), Chopati, and Daryai Booti (Eclipta prostata), etc.
Prepare the land thoroughly. Cultivate fodder or green manure crops in rotation with rice fields. If sufficient water is available, maintain a water level of one to two inches in the field for 20 to 25 days after transplanting the seedlings.
Consult with an agricultural extension worker for the selection and use of chemical herbicides for weed control. Scatter the herbicides in water using a shaker bottle within 3 to 5 days of transplanting the seedlings. Do not allow the field to dry for 4 to 5 days after this. If weeds emerge in the crop for any reason, spray the recommended post-emergence herbicides in “Tar Wattar” condition (optimal moisture) within one month of transplanting the seedlings and irrigate the field 24 hours after spraying.
For best results, apply fertilizers according to soil chemical analysis. However, the following fertilizer amounts are recommended for an average fertile soil after wheat harvesting.
| Rice Variety | N (kg) | P (kg) | K (kg) | Fertilizer at Sowing (Bags) | Second Nitrogen Application (Bags) | Third Nitrogen Application (Bags) |
|---|---|---|---|---|---|---|
| Coarse Varieties | 69 | 40 | 32 | 1.75 bags DAP + 0.25 bags Urea + 1.25 bags SOP | 1 bag Urea | 1 bag Urea |
| 4.5 bags SSP (18%) + 1 bag Urea + 1.25 bags SOP | ||||||
| 2 bags Nitrophos + 2.25 bags SSP (18%) + 1.25 bags SOP | 1.75 bags Calcium Ammonium Nitrate | 1.75 bags Calcium Ammonium Nitrate | ||||
| Basmati Fine Varieties | 55 | 35 | 25 | 1.5 bags DAP + 0.25 bags Urea + 1 bag SOP | 0.75 bags Urea | 0.75 bags Urea |
| 4 bags SSP (18%) + 0.75 bags Urea + 1 bag SOP | ||||||
| 1.75 bags Nitrophos + 2 bags SSP (18%) + 1 bag SOP | 1.25 bags Calcium Ammonium Nitrate | 1.25 bags Calcium Ammonium Nitrate |
Apply the full amount of phosphorus and potassium fertilizer and one-third of the nitrogen fertilizer at the time of land preparation, i.e., just before the final planking.
Apply the remaining nitrogen fertilizer in two equal installments. Complete the application of nitrogen fertilizer before August 20th.
If phosphorus and potassium fertilizer could not be applied at the time of land preparation, it can also be applied one week or ten days after transplanting the seedlings.
Potassium fertilizer can also be applied with the second installment of nitrogen fertilizer. According to experiments at Adaptive Research Gujranwala, the effectiveness of potassium fertilizer increases when applied in two installments, i.e., at the time of land preparation before the final planking and with the second installment of urea.
Adjust the fertilizer rate for recommended hybrid varieties according to their specific requirements.
Use 200 grams of zinc sulfate (33%) or 250 grams of zinc sulfate (27%) or 300 grams of zinc sulfate (21%) per marla two weeks after sowing the rice nursery.
Before transplanting the nursery into the field, dip its roots in a 2% zinc oxide solution. For this, dissolving one kilogram of zinc oxide in 50 liters of water is sufficient for one acre of nursery.
The above two methods are effective in case of minor deficiency.
| Fertilizer Name | Bag Weight (kg) | N (%) | P2O5 (%) | K2O (%) |
|---|---|---|---|---|
| Urea | 50 | 46 | - | - |
| Calcium Ammonium Nitrate (CAN) | 50 | 26 | - | - |
| Triple Super Phosphate (TSP) | 50 | - | 46 | - |
| Single Super Phosphate (18%) | 50 | - | 18 | - |
| Diammonium Phosphate (DAP) | 50 | 18 | 46 | - |
| Nitrophos | 50 | 22 | 20 | - |
| Potassium Sulfate (SOP) | 50 | - | - | 50 |
| Potassium Chloride (MOP) | 50 | - | - | 60 |
The amount of organic matter in our soils is very low, and the use of organic fertilizers is essential to improve it. Moreover, due to the rising prices of chemical fertilizers, the use of organic and green manures is the need of the hour. The use of green manure is an important strategy to improve the amount of organic matter in the soil. Several crops are important for green manure. Sesbania gives better results as green manure. Its use is relatively better in the rice area. According to experiments conducted at Adaptive Research Farm Gujranwala, the need for fertilizers, especially nitrogenous fertilizers, for the crop (i.e., rice, etc.) grown after using Sesbania as green manure is significantly reduced.
Immediately after harvesting wheat or Rabi crops for Sesbania cultivation, plow the field once and irrigate it. Broadcast Sesbania seeds at a rate of 15 to 20 kg per acre. Soak the seeds in water for a few hours before broadcasting. About 15 to 20 days before transplanting Basmati rice seedlings, when the Sesbania crop starts flowering, incorporate it into the soil by running a rotavator, etc. After this, keep standing water in the field and puddle a few days before transplanting rice. Half a bag of urea per acre can be used to decompose the Sesbania residues better.
According to experiments by the Soil Fertility Institute Lahore, Sesbania can also be sown in the standing wheat crop. For this, broadcast 8 kg of Sesbania seeds per acre at the time of the last irrigation of wheat. The Sesbania will germinate. After wheat harvesting, irrigate the field. Broadcast another 8 kg of seeds per acre. The Sesbania crop will be affected by the wheat harvest, but it will grow back quickly. Soak the seeds in water for a few hours before broadcasting. Sowing Sesbania immediately after harvesting wheat or Rabi crops is also possible, but broadcasting Sesbania in standing wheat gives it more time. About 15 to 20 days before transplanting the next crop or rice seedlings, incorporate Sesbania into the soil by running a disc or rotavator. Half a bag of urea per acre can be used to decompose the Sesbania residues quickly. Reduce this amount of urea in the next crop. Sow the next crop when the time comes.
At the time of nursery transplanting, maintain a water depth of one to one and a half inches in the field. If there is too much standing water, strong winds can uproot the seedlings.
Gradually increase the water depth a week to ten days after transplanting, but do not exceed 3 inches, as this will reduce tillering.
Keep the field flooded with water for 20 to 25 days after transplanting the seedlings (up to 15 days in case of water scarcity) and then allow the field to dry for 5 to 6 days. Remember to keep the field moist and prevent it from drying out, otherwise cracks will form in the soil, making it difficult to flood the field again.
After this, irrigate the crop with “Tar Wattar” (optimal moisture) irrigation. However, when applying granular insecticides, ensure that there is one and a half to two inches of standing water in the field for 5 to 6 days. Irrigating at this stage will ensure proper plant height, prevent lodging, and reduce pest and disease attacks, leading to timely crop maturity.
Stop irrigating two weeks before harvesting, i.e., after the grain filling stage, to avoid difficulties due to wet fields at the time of harvesting. In fields where water does not stand, continue irrigating with “Wattar” irrigation.
Remember not to let the crop experience water stress during panicle emergence and grain filling. The “Bhala” disease of rice, especially in Basmati varieties, is more common in areas where water does not stand in the fields. In these areas, from panicle emergence to grain filling, ensure that the field does not dry out and try to maintain “Tar Wattar” conditions. Otherwise, the blast disease will be more prevalent. Continuous standing water can lead to stem rot disease.
Transplanting rice seedlings raised in nurseries is a common and successful method. However, due to the increasing shortage of labor, nursery-raised seedlings are becoming expensive, and the recommended plant population per acre is often not achieved. These issues can be addressed by adopting the direct seeding method. This method ensures the recommended plant population per acre and increases the speed of work, meaning more area can be sown in less time compared to traditional methods. In some cases, it can also save water. The land is easily prepared after rice harvesting, allowing for timely sowing of subsequent Rabi crops. However, seed germination and weed control are crucial challenges in this technology. Farmers should fully understand these factors before adopting this method.
Land preparation is very important in this method, especially land leveling to ensure better crop germination and uniform water application. For good land preparation, plow the field twice with a dry plow a few days before sowing and level the land. Then irrigate the field. Prepare the field when it reaches “wattar” (optimal moisture). This will also kill germinated weeds. In direct seeding of rice, it is important to remember that the same variety should be sown as the previous year, as a significant number of seeds from the previous year may germinate. Avoid direct seeding in fields heavily infested with horse grass (Leptochloa chinensis) or similar weeds. Similarly, saline soils are not suitable for this method.
All approved varieties except Kissan Basmati can be directly seeded.
Use 8 to 10 kg of seed per acre for Basmati and fine varieties, and 10 to 12 kg for coarse varieties. Treat the seed with a recommended fungicide in consultation with the Department of Agriculture Extension staff before sowing.
The best sowing time for coarse varieties is May 20th to June 7th, and for Basmati varieties, June 7th to June 25th.
Sow using a DSR (Direct Seeded Rice) drill in prepared dry land. Maintain a row spacing of 9 inches and a seed depth of not more than one and a half inches. During sowing, keep checking the seed tubes to ensure they are not blocked by soil clods. After completing each round, lift the drill machine and turn the side wheel to check if seeds are falling on the ground from all tubes. If any hole is blocked, clear it with a thin stick. If any row is left unsown, drop seeds by hand and cover them with a light layer of soil. The recommended amount of phosphorus and potash fertilizer to be applied at the time of sowing can also be drilled. After sowing, make small beds in the field and apply light irrigation.
If a DSR drill is not available, direct seeding can be done by broadcasting. For this, after preparing the dry land, plow lightly from north to south, ensuring the plow does not go more than one inch deep into the soil. Broadcast the seeds twice and run a plank in the same direction. The recommended amount of phosphorus and potash fertilizer to be applied at the time of sowing can also be applied during land preparation. After sowing, make small beds in the field and apply light irrigation.
If sowing is to be done in “Wattar” land, sow using a DSR drill or broadcast and plank according to the method described above after preparing the land and making small beds. A few days later, when the crop germinates, i.e., shoots emerge from the ground, apply light irrigation to the field. Then irrigate with “Wattar” irrigation for one month and continue irrigating with “Wattar” irrigation afterwards.
This cultivation method has significant weed problems and limited opportunities for their control. Therefore, more attention is needed for their control. Conditions are more favorable for weed germination and growth in the early stages of crop growth. Integrated control methods are as follows:
Pre-sowing: Plow the field by double harrowing in the first half of May.
Post-sowing (Puddled): If rice is sown in puddled conditions, spray the recommended pre-emergence herbicide immediately after sowing.
Post-sowing (Dry): If rice is sown in dry land, irrigate immediately after sowing and spray the recommended pre-emergence herbicide the next day. Ensure no standing water is present in the field at the time of spraying.
Post-emergence: To control emerged weeds, spray the recommended post-emergence herbicide in “Tar Wattar” (optimal moisture) conditions 15 to 20 days after sowing. Sometimes, one spray is sufficient. If weeds re-emerge, spray again 40 days after sowing. The field should be in “Tar Wattar” conditions at the time of spraying. Irrigate the field 24 to 36 hours after both sprays and keep standing water for 4 to 6 days.
Irrigation depends on the weather, soil, and cultivation method. Proper leveling of the field is very important for better water utilization.
Apply the first irrigation 5 to 7 days after sowing the crop. After germination, continue irrigating with “Tar Wattar” (optimal moisture) for 30 days. After that, irrigate with “Wattar” irrigation.
When applying granular pesticides, keep standing water in the field for 3 to 4 days so that the pesticide can take full effect.
Do not let the crop experience water stress at the time of grain filling, otherwise, yield may be affected.
Stop irrigating 15 to 20 days before harvesting, considering the soil type.
Proper and balanced fertilizer application is crucial for achieving a good rice yield. Improper application can hinder root development, leading to lodging and reduced yield. Soil testing is recommended for balanced fertilization. However, for an average fertile soil, the following fertilizer recommendations are given for rice.
Apply 6 kg of zinc sulfate (33%) or 7.5 kg of zinc sulfate (27%) or 10 kg of zinc sulfate (21%) per acre 30 to 35 days after sowing along with the first installment of nitrogen fertilizer.
In case of boron deficiency, apply 3 kg of boric acid (17%) or 4.5 kg of borax (10.5%) per acre at the time of land preparation. If boron was used in the previous crop, there is no need to use it in rice.
To achieve the best rice yield, the recommended number of plants per acre is very important. According to surveys, the number of plants per acre in farmers’ fields is often quite low. Firstly, laborers for transplanting are not readily available, and secondly, they do not transplant the required number of rice plants. In addition to transplanting more area in less time, achieving the recommended number of plants per acre is possible through rice transplanters. Promoting this cultivation method requires farmers to be aware of the use of relevant machinery, nursery raising, transplanting, and proper field preparation. Successful experiments related to this cultivation method have been conducted under the supervision of Adaptive Research Farms and Rice Research Institute Kala Shah Kaku.
100 to 120 trays are required to prepare a nursery for one acre of rice, and the seed quantity should be 8 to 10 kg per acre.
Use certified, disease-free seed treated with recommended fungicide.
The land should be level, and if planting with a seeding machine, the soil should not be too soft so that the machine can move easily.
The soil for the trays should be fertile (loam or clay loam) and free from stones or clods, etc. Sieve the soil through a 5 mm mesh sieve.
After filling the soil, place the trays in a straight line. Approximately 100 trays can be placed in one marla. Afterwards, water them, but the water should not rise above the trays, and they should not be soaked. Standing water can be maintained when the nursery grows taller.
If the nursery appears small or weak, broadcast one to one and a half kilograms of urea fertilizer per 100 trays one week to ten days after sowing. According to experiments at Adaptive Research Gujranwala, if 2 kg of DAP fertilizer is applied per 100 trays instead of urea, the nursery becomes healthier and is ready for transplanting in 18 to 20 days.
Use recommended pesticides in case of insect attacks, etc.
The nursery is ready for transplanting 25 to 30 days after sowing. About 12 hours before transplanting, remove the trays from water and place them in a dry place to dry slightly so that the machine’s performance is not affected by excess wet soil on the nursery roots.
Before starting seedling transplanting, apply oil and grease, etc., to all parts of the machine.
Do not force the machine and take special care of the engine oil.
It is very important for the field to be well-levelled for seedling transplanting. It is better to level it using a laser land leveler.
Prepare the field thoroughly by puddling two days before seedling transplanting. At the time of transplanting, the amount of water in the field should be less than one inch and uniform.
When the machine is turning while transplanting seedlings, stop planting so that the machine is not damaged. Plant seedlings in the empty space by making a straight pass with the machine.
If the machine skips planting seedlings during transplanting, check it thoroughly and correct it. Fill the gaps with seedlings by hand using laborers.
Keep the other requirements of the machine-planted crop, such as fertilizers, pesticides, and water application, according to the recommendations for a normal crop.
Maintain a row spacing of 12 inches and a plant-to-plant spacing of 6 inches using the machine. However, there is a facility to adjust the plant-to-plant spacing in the transplanter.
Do not plant seedlings deeper than one and a half inches so that they can tiller well.
Generally, the rice crop is attacked by brown spots on leaves, bacterial blight, sheath blight, blast, false smut, and stem rot. Their symptoms and control methods are described below.
This disease is caused by a fungus (Bipolaris oryzae) and attacks both Basmati and coarse varieties. Its attack is more severe in potash-deficient fields. The disease also attacks grains in addition to leaves. Small, round or oval spots appear on the leaves, with brown edges and a grayish center. In severe attacks, the number of spots is very high. In case of grain attack, somewhat round or elongated blackish-brown spots appear. The panicle appears scorched from a distance.
Control:
Use disease-free seed. Treat the seed with a recommended fungicide in consultation with the local agricultural extension worker. Use potash fertilizer along with a balanced amount of nitrogen and phosphorus fertilizer. Spray Difenoconazole or Propiconazole at a rate of 65 grams, or Difenoconazole at a rate of 125 ml, or Sulfur at a rate of 800 grams per acre when disease symptoms appear.
This disease is caused by a bacteria (Xanthomonas oryzae pv. oryzae) and appears on the crop at the tillering stage. It starts from the tip and edges of the leaf and spreads lengthwise and widthwise, reaching the healthy parts of the leaf. Disease symptoms appear on the leaves as white, moist streaks, which later dry and turn white, and the leaf curls upwards. Initially, the attack occurs in patches, which later spread in favorable weather conditions and engulf the entire crop. The crop appears scorched from a distance. Very few grains are formed on diseased plants, and yield is affected.
Control:
Do not cultivate unapproved and prohibited varieties. Transplant the nursery on time and use only 25 to 35-day-old seedlings to avoid injury from cutting the top due to excessive height. Irrigate the nursery one day before uprooting to prevent root breakage. Do not let water from a diseased field flow into another field to prevent disease transmission. Control weeds in rice fields in a timely manner to break the life cycle of the bacteria and prevent its further spread. Effectively control rice pests, especially leaf folder, in a timely manner. Identify the disease at an early stage and uproot and destroy diseased plants and a few healthy plants around them. The use of potash increases disease resistance. Apply nitrogen fertilizer in three equal installments, i.e., at the time of land preparation and 25 and 50 days after transplanting the nursery. In case of attack, spray Copper Oxychloride at a rate of 500 grams or Copper Hydroxide at a rate of 250 grams per acre or Copper Oxychloride Kasugamycin at a rate of 250 grams per 100 liters of water.
This disease is caused by a fungus. At the beginning of the attack, moist spots of 1 to 3 cm long and oval, greenish-gray in color, appear on the leaf sheath near the water level, which later become irregularly shaped, whitish-gray from the inside and somewhat dark brown or reddish-brown from the edges. In case of attack at an early stage of the crop, the tillering capacity of the plants is reduced. In severe attacks, the panicles fall off. Due to the disease, the supply of food to the grains is not proper, which affects yield and quality. Use balanced fertilizers for control and spray recommended pesticides.
This disease is caused by a fungus (Pyricularia oryzae). It attacks Basmati varieties more. It attacks leaves, nodes, panicle neck, and panicle. Its attack is severe in fields with loamy soils that do not have water retention capacity. Eye-shaped spots appear on the leaves, which are pointed on both sides. Their edges are dark brown and their center is ash-colored. In favorable conditions, these spots enlarge and merge, drying out a large portion of the leaf, which greatly reduces the plant’s food-making capacity. In case of panicle attack, dark spots appear on the nodes, which completely encircle it. The affected node and the part above it dry out. In case of panicle neck or panicle attack, blackish spots form a halo around it, which prevents food from reaching the grains, and the grains do not fill properly. In severe attacks, grains do not form.
Control:
Do not cultivate late. Destroy stubble and old straw of the affected crop after harvesting, as they contain disease spores. Apply nitrogen and phosphorus fertilizer in appropriate amounts. Do not let a field dry out from the tillering stage to two weeks after panicle emergence. When disease symptoms appear, spray Azoxystrobin + Difenoconazole at a rate of 200 ml, or Trifloxystrobin + Tebuconazole at a rate of 65 grams, or Azoxystrobin at a rate of 125 ml, or Sulfur at a rate of 800 grams, or Validamycin + Difenoconazole at a rate of 250 grams per acre.
This disease is caused by a fungus (Fusarium moniliforme). Affected plants are taller, thinner, and pale yellow compared to healthy plants. Brown spots appear on the stem, and the stem rots at those spots. This disease spreads through the cultivation of infected seeds and the presence of the previous year’s diseased straw and plant debris in the field. The leaves of severely affected plants start drying from the bottom up and the plant dies. The stem rots at the lower nodes. Roots emerge from the nodes above the affected area. The plant elongates and dies, and a white or pinkish-white fungal growth appears on it, containing millions of disease spores. These spores cause disease in other plants. Sometimes, a few tillers of the affected plant die, and new tillers emerge from the remaining stems, but they produce very few grains. A few diseased plants can contaminate the entire field, which can cause disease spread in the following year.
Control:
Cultivate resistant varieties like Super Basmati, Shaheen Basmati, Ari 6, KS 282, KS 133, and Niab Ari 9 in disease-prone fields. Uproot and destroy diseased plants. Do not take seeds from a diseased field. Do not transplant Bakanae-affected nursery into the field. Treat seeds with recommended fungicides, as this is an effective way to control Bakanae, and spraying on the crop is not very effective in this regard.
This disease is caused by a fungus (Sclerotium oryzae) which attacks both coarse and Basmati varieties. Symptoms of this disease appear after panicle emergence. The sclerotia (disease reservoirs) of the disease attach to the upper layer of the stem (leaf sheath) at the water level and create blackish-brown spots. The upper layer rots, and then the disease attacks the stem. The stem rots, and the crop lodges. In case of severe attack, grains do not form on the panicle, and it appears white. If the stem is cut open at the affected area, numerous small black sclerotia of the disease are visible inside. The attack of the disease affects yield.
Control:
Destroy rice debris present in the diseased field so that the sclerotia of the disease are destroyed. Do not keep water standing at the same level in the field for many days. Do not let water from a diseased field flow into another field. Do not keep water standing continuously in the field 50 to 55 days after nursery transplanting; instead, irrigate the crop with “Wattar” irrigation. At the time of land preparation, the sclerotia of the disease float on water and accumulate at the corners or edges of the field. Collect and destroy them from there. Practice crop rotation.
Generally, rice crops are attacked by stem borers, leaf folders, white-backed planthoppers, and brown planthoppers. Stem borers attack Basmati varieties more severely. Leaf folders attack both Ari and Basmati varieties equally, while white-backed planthoppers generally attack Ari varieties more. In the absence of Ari varieties, they also attack Basmati varieties. Additionally, grasshoppers damage both rice nurseries and crops. Rice hispa also attacks rice. Armyworms are not a common pest, but their attacks have been observed in some places and are quite severe. The life cycle and control of these pests are detailed below.
Stem borers attack rice crops, especially Basmati varieties, severely. Yellow and white stem borers cause more damage, while pink stem borers cause less damage. These pests spend the winter in the larval stage inside rice stubble. These larvae turn into pupae in late March or early April, from which moths emerge and pose a threat to the next crop. These larvae enter new tillers and feed from the inside, causing the central shoot to dry up, known as “dead heart.” If stem borer attacks occur at the time of panicle formation, the affected panicles turn white, known as “white heads,” and these panicles do not produce grains.
The full-grown larva is yellowish-white. There is a black dot-like mark in the middle of the forewings of the moth. This pest damages both rice nurseries and crops in the larval stage. During winter, larvae hibernate in rice stubble.
The moth is shiny and milky white. The female moth has a tuft of yellow hairs at the end of its abdomen. The larva is pale yellow or slightly off-white. In the early stages of rice nurseries and crops, the affected shoot is called a “dead heart.” During winter, larvae hibernate in rice stubble.
The moth is brown with a heavy, broad body covered with thick hairs. There is a light cream-colored line lengthwise in the middle of the forewings. The full-grown larva is pink and causes “dead hearts” in the early stages of the crop. Besides rice, maize, wheat, sugarcane, sorghum, and wild sugarcane are its host plants. Shortly before the rice crop ripens, it spends time on sugarcane and sorghum until late October. After hibernating in these crops in the early days of winter, it moves to rice. Its egg stage is in the form of clusters.
The moth’s wings are golden to brown with wavy lines. The larva’s head is black, and its body is cream-colored. These larvae feed on the green tissue of leaves, causing silvery lines to appear on the leaves. After hatching from eggs, the larva stays on the open leaf for a day or two and then joins the two edges of the leaf with a thread made of its saliva, forming a tube-like structure, and feeds on the green tissue from inside. This affects photosynthesis and reduces food production. Its attack occurs in patches. The attack is more severe in shady areas.
Planthoppers are very small in size but cause significant damage. They suck sap from the lower part of the plant, i.e., the stem. When the crop dries up due to sap sucking, they attack the panicles and grains. Their attacks usually start in patches in the field. Both adults and nymphs suck sap from the stems and tillers. Affected tillers first turn yellow and then brown. In severe attacks, the entire crop dries up and appears scorched. This type of attack is called “hopper burn.” It usually attacks the crop in the second week of September. Its attack is relatively more severe on coarse varieties.
This pest has been observed in some specific areas. It attacks the crop one and a half to two months after transplanting. Adults of this pest scrape the upper and lower surfaces of leaves, feeding on the green tissue, resulting in white streaks and dried leaves. Due to the reduced green tissue, the plant cannot produce food, affecting crop growth. In severe attacks, rice fields appear burnt or scorched.
Grasshoppers attack both nursery and mature crops, but nursery attacks are more severe. Nymphs and adults feed on leaves. In severe attacks, re-transplanting the nursery may be necessary. Most grasshopper species are green, but some are brown or mottled. Grasshoppers lay eggs in clusters on the ground or on tillers. This pest overwinters in the egg stage on field bunds or in the soil. Nymphs hatch in early March and feed on berseem, sunflower, sugarcane, and weeds, and after damaging these crops and green fodder, they attack rice nurseries.
The larva is dark green with light stripes on its body. It has four to five generations per year. It usually attacks vegetables, fodder, cotton, and tobacco, causing severe damage. Now, it has started attacking rice crops. This pest belongs to the group of cutting and gnawing insects. The larva cuts and destroys the tillers of the mature crop. In severe attacks, a layer of cut tillers and grains accumulates on the ground, resulting in significant yield loss. This larva mostly attacks mature crops, so spraying or dusting with pesticides that have a short residual effect is recommended.
Spray in the morning after dew has evaporated or in the evening.
Bury empty pesticide bottles deep in the ground.
Ensure the spray machine does not leak.
Wear full clothing and closed shoes while spraying.
Use a hollow cone nozzle for insecticides and a T-jet nozzle for herbicides.
Do not spray in strong winds.
Wear goggles and a mask.
Avoid eating, drinking, or smoking while spraying.
If pesticide gets on the body or in the eyes, wash the affected area thoroughly with water.
If accidentally affected by the pesticide, immediately move to fresh air and consult a doctor immediately. Also, be sure to show the pesticide label.
Beneficial insects, acting as predatory insects, naturally control harmful insects in crops. Examples include dragonflies, Trichogramma wasps, ladybugs, Chrysoperla, praying mantises, and spiders. To provide a safe environment for these beneficial insects, avoid indiscriminate use of pesticides. Do not burn fields after harvesting, as it not only helps keep the environment clean but also protects beneficial insects.
Farmers should avoid unnecessary spraying of pesticides on rice crops. Do not use pesticides that have long-lasting effects on the crop and rice. If rice contains pesticide residues, it will not be in demand in the international market. Use recommended safe pesticides when insect and disease attacks reach economic thresholds.
When using pesticides on crops, always consider the recommended pre-harvest interval to avoid residues in the produce. Additionally, ensure the produce is safe for consumption and does not get rejected in the international market if exported. Details regarding recommended pesticides for rice are given below.
| Sr. No. | Pesticide Name | Pest | Quantity per Acre | Pre-Harvest Interval (Days) | IRAC Group |
|---|---|---|---|---|---|
| 1 | Bifenthrin 10% EC | Grasshoppers | 250 ml | 30 | 3A |
| 2 | Fipronil 5% SC, 80% WG | Grasshoppers | 480 ml, 30 grams | 14 | 2B |
| 3 | Cartap 4% G, 8% SP | Stem Borers | 4 kg, 4.5 kg | 21:7 | 14 |
| 4 | Cartap 4% G | Leaf Folder | 6 kg | 21:7 | 14 |
| 5 | Fipronil + Cartap 4.3% G | Stem Borers, Leaf Folder | 6 kg | 21:7 | 14+28 |
| 6 | Fipronil 0.3% G | Stem Borers, Leaf Folder | 6 kg | 14 | 2B |
| 7 | Thiamethoxam + Chlorantraniliprole 0.6% GR, 40% WG | Stem Borers | 4 kg, 40 grams | 30 | 28+4A |
| 8 | Thiamethoxam + Chlorantraniliprole 40% WG | Leaf Folder | 40 grams | 30 | 28+4A |
| 9 | Methoxyfenozide 5% GR, 10% GR | Stem Borers | 7 kg, 4 kg | 14 | - |
| 10 | Lambda-cyhalothrin 2.5% EC | Stem Borers, Leaf Folder | 200 ml | 15 | 3A |
| 11 | Gamma-cyhalothrin 60 CS | Leaf Folder | 75 ml | 21 | 3A |
| 12 | Emamectin benzoate + Lambda-cyhalothrin 12% EC | Stem Borers, Leaf Folder | 100 ml | 16 | 3A+6 |
| 13 | Clothianidin 20% SC | White-backed Planthopper, Brown Planthopper | 30-60 ml | 14:7 | 4A |
| 14 | Pymetrozine 50% WG, 25% WG | White-backed Planthopper, Brown Planthopper | 60 grams, 30 grams | 14 | 9B |
| 15 | Profenofos + Nitenpyram 70% WG | White-backed Planthopper, Brown Planthopper | 200 grams | 14 | 9B+16 |
| 16 | Nitenpyram, Pymetrozine 80% WDG, 60% WDG | White-backed Planthopper, Brown Planthopper | 24-48 grams, 100 grams | 14 | 9B+4A |
| 17 | Sulfoxaflor 240 SC | White-backed Planthopper, Brown Planthopper | 80 ml | 7 | 4C |
| 18 | Chlorantraniliprole 0.4% GR, 20% SC | Stem Borers | 4.5 kg, 50 ml | 14 | 28 |
| 19 | Flubendiamide 48% SC | Stem Borers | 75 ml | 7 | 28 |
| 20 | Dinotefuran + Chlorfenapyr 43% WDG | White-backed Planthopper, Brown Planthopper | 150 grams | 7 | 4A+13 |
| 21 | Chlorfenapyr + Nitenpyram 50% WG | White-backed Planthopper, Brown Planthopper | 150 grams | 21 | 13+4A |
| 22 | Flonicamid 50% WG | White-backed Planthopper, Brown Planthopper | 60 grams | 7 | 29 |
| Sr. No. | Pesticide Name | Disease | Quantity per Acre | Pre-Harvest Interval (Days) | IRAC Group |
|---|---|---|---|---|---|
| 1 | Difenoconazole 250 EC | Blast | 125 ml | 14 | 3 |
| 2 | Hexaconazole 5% SC | Sheath Blight | 400 ml | 21 | 3 |
| 3 | Azoxystrobin 25% SC | Blast | 180 ml | 28 | 11 |
| 4 | Azoxystrobin + Difenoconazole 30% SC | Blast, Brown Spot, Sheath Blight | 200 ml | 14:7 | 24 |
| 5 | Kasugamycin 4% WP, 2% SL | Bacterial Leaf Blight, Blast, Sheath Blight | 300 grams, 600 grams | 7:3 | 24 |
| 6 | Azoxystrobin + Difenoconazole 32.5% SC | Blast | 200 ml | 14:7 | 3+11 |
| 7 | Trifloxystrobin + Tebuconazole 75% WG | Blast, Brown Spot | 65 grams | 35 | 3+11 |
| 8 | Azoxystrobin + Propiconazole 32% SC | Sheath Blight | 200-250 ml | 35 | 3+11 |
| 9 | Azoxystrobin + Tebuconazole 50% SC | Sheath Blight | 24-44.8 ml | 28 | 3+11 |
| 10 | Validamycin + Difenoconazole 12% WP | Blast | 250 grams | 35:14 | U18 |
| 11 | Copper Hydroxide 77% WP | Bacterial Leaf Blight | 200 grams | 14 | M01 |
| 12 | Copper Oxychloride 50% WP | Bacterial Leaf Blight | 250 grams | 14 | M01 |
| 13 | Sulfur 80% WG | Bacterial Leaf Blight, Blast, Brown Spot | 800 grams | 7:5 | M02 |
| 14 | Validamycin 10% SL, 5% SL | Sheath Blight | 400-500 ml, 1000-1200 grams | 35:14 | U18 |
| Sr. No. | Herbicide Name | Pest (Weeds) | Quantity per Acre | Application Instructions | Pre-Harvest Interval (Days) | IRAC Group |
|---|---|---|---|---|---|---|
| 1 | Triafamone + Ethoxysulfuron 30% WDG | Broadleaf and Grass Weeds | 75 grams | Spray after sowing the crop. Keep the soil moist (Wattar) for 1-3 days after spraying. | 21 | B+ |
| 2 | Pendimethalin 33% EC | Broadleaf and Grass Weeds | 1 liter | Spray 24-36 hours after sowing. Ensure no standing water is present in the field at the time of spraying. | 14 | K1 |
| 3 | Oxyfluorfen 80% WP | Broadleaf and Grass Weeds | 40 grams | Spray 24-36 hours after sowing. Ensure no standing water is present in the field at the time of spraying. | 85 | E |
| Sr. No. | Herbicide Name | Pest (Weeds) | Quantity per Acre | Application Instructions | Pre-Harvest Interval (Days) | IRAC Group |
|---|---|---|---|---|---|---|
| 1 | Butachlor 60% EC | Broadleaf, Sedge, and Grass Weeds | 800 ml | Apply 1-5 days after transplanting. | 60 | K3 |
| 2 | Pretilachlor 50% EC | Broadleaf, Sedge, and Grass Weeds | 400 ml | Apply 1-5 days after transplanting. | 60 | K3 |
| 3 | Alachlor 50% EC | Broadleaf, Sedge, and Grass Weeds | 100 ml | Apply 1-5 days after transplanting. | 14:7 | K3 |
| Sr. No. | Herbicide Name | Pest (Weeds) | Quantity per Acre | Application Instructions | Pre-Harvest Interval (Days) | IRAC Group |
|---|---|---|---|---|---|---|
| 1 | Metamifop 10 EC | Barnyard Grass | 800 ml + 500 ml Adjuvant | Apply 12-15 days after sowing or when weeds are at 3-4 leaf stage. Irrigate one day after spraying and maintain standing water for 5 days. | 90 | A |
| 2 | Bispyribac-sodium 30% WDG + Adjuvant | All weeds except Barnyard Grass, Nutgrass, etc. | 100 grams + 160 ml Adjuvant | Apply 18-22 days after sowing in “Wattar” (optimal moisture) conditions. | 80 | B+B |
| 3 | Cyhalofop-butyl 16% OD + Bispyribac-sodium | Grass and Nutgrass family weeds | 400-500 ml | Apply 7-14 days after sowing when weeds are at 3-4 leaf stage in “Wattar” (optimal moisture) conditions. | 30 | B+A |
| 4 | Penoxsulam + Fenoxaprop-p-ethyl 10% OD | Grass and Broadleaf weeds | 250-300 ml | Apply 15-21 days after sowing in “Wattar” (optimal moisture) conditions. | 60 | A+B |
| 5 | Ethoxysulfuron 60% WG | Ghoeen, Bhoeen, Deela, Kataki, Maroi Booti, Chopati, etc. | 20 grams | Apply 15-20 days after sowing in “Wattar” (optimal moisture) conditions. | 21 | B |
| 6 | Cyhalofop-butyl + Bispyribac-sodium + Penoxsulam 14% OD | Grass, Nutgrass family, and Broadleaf weeds | 400-500 ml | Apply 7-14 days after sowing when weeds are at 3-4 leaf stage in “Wattar” (optimal moisture) conditions. | 60 | B+B+A |
To achieve a good and quality yield, harvest the crop at the appropriate time. The suitable time for manual harvesting is when the upper grains of the panicle are ripe, and the lower two to three grains are green but filled. The moisture content in the grains should be 20 to 22 percent. If the crop is to be harvested with a combine harvester, harvest when 100 percent of the grains are ripe.
Rice harvesting is increasingly being done by combine harvesters. Generally, the same machines used for wheat harvesting are employed. These machines tend to break rice grains and remove the husk during rice harvesting. In machine harvesting, green, weak, empty grains, and green parts of the plant are included in the produce, affecting its quality. Follow the guidelines below for machine harvesting:
Pest Scouting: The process of assessing harmful insects and the damage they cause to crops is called pest scouting.
Pest Survey: The process of estimating the presence of insects in a large area is called a pest survey.
The survey process continues throughout the year. This helps identify areas where there is a risk of future attacks. Furthermore, the insect’s life cycle is determined.
This method is commonly used for pest scouting in rice nurseries. As shown in the diagram, one to four different locations are selected, and a one-square-foot point is taken from each. These points represent the relevant field or plot.
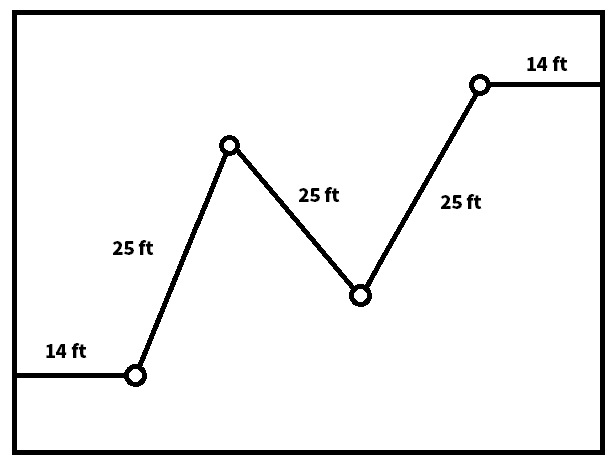
As shown in the diagram, start walking from one corner of the field to the other. Take the first point 14 steps from the first corner. The point will be one square meter. Take the second point after 25 steps. Similarly, take the third and fourth points after 25 steps each. Finally, there will be a distance of 14 steps from the corner.

If the rice crop is in block form and the crop type, age, and condition are the same, select one field. This will be called the representative field. Perform pest scouting using the transect method on the selected field. This method is practically easy and scientifically very good.
The total number of plants and tillers will be determined at four designated locations. The number of infested tillers will be determined from these, and the percentage of infestation will be noted.
Planthopper infestation starts according to average conditions and intensifies in mid-September. This pest causes damage in both adult and nymph stages. According to the mentioned pest scouting methods, the number of adults and nymphs per plant will be noted at all four points selected from the selected field.
Leaf folder infestation starts approximately 45 days after transplanting the nursery, but its numbers continue to increase. According to average conditions, the infestation intensifies in early September, and the larvae eat the green matter of the leaves by making a closed tube. According to the above-mentioned pest scouting methods, the number of closed tubes per plant is counted from all four points.
The number of plants will be determined from the designated locations. Then, the number of black bug adults or nymphs on these same plants will be determined. In this way, the number of bugs (grubs) per plant will be determined.
Since the rice nursery is cultivated in patches of different sizes and shapes, use a one-square-foot frame when scouting for pests. Select four different locations according to the size and shape of the field, then note the total number of plants and the infested tillers among them and determine the percentage of infestation.
| Sr. No. | Pest/Disease Name | Month | Economic Threshold | Nursery (Number/ Percentage) | Crop (Number/ Percentage) |
|---|---|---|---|---|---|
| 1 | Stem Borers | May, August, September | Number of Moths on Light Traps per Night | 4-5 | 8-10 |
| 2 | White-backed and Brown Planthoppers | August | Number of Nymphs or Adults per Plant | - | 15-20 |
| 3 | Leaf Folders | August, September | Number of Infested Rolled Leaves per Plant | - | 20-25 |
| 4 | Rice Hispa (Black Bug) | - | Number of Insects per Plant | - | 2 |
| 5 | Grasshoppers | - | Number of Adult Insects per Net | 3 | 5 |
| 6 | Blast, Sheath Blight, Brown Spot | September, October | Appearance of Disease Symptoms | - | - |
| Pest/Disease Name | Nature of Infestation Damage | Calculation from Obtained Material | Severity |
|---|---|---|---|
| Stem Borers | Percentage of White Heads | (Number of White Heads / Total Number of Tillers) x 100 | 5.44% |
| Leaf Folders | Number of Rolled Leaves per Plant | Number of Rolled Leaves / Number of Plants | 1.57 per plant |
| Black Bug | Number per Plant | Number of Insects / Number of Plants | 0.35 per plant |
| Grasshoppers | Percentage of Infestation | (Number of Infested Plants / Total Number of Plants) x 100 | 14.28% |